
In this article:
Winter has definitely arrived in a grand fashion this year and with all those freezing mornings and way too early evenings, all you want to do is curl up under a blanket and drink a warm cup of tea.

But do you know that certain yoga poses can heat you up from within and keep the inner fire burning all the way until spring comes knocking on the door?
Try these three yoga poses and feel your body getting warm and comfortable.
1. Chair Pose (Utkatasana)
Every yoga practitioner will agree that the Chair Pose warms up the body better than other poses, creating heat from stillness.
How to do the Chair Pose:
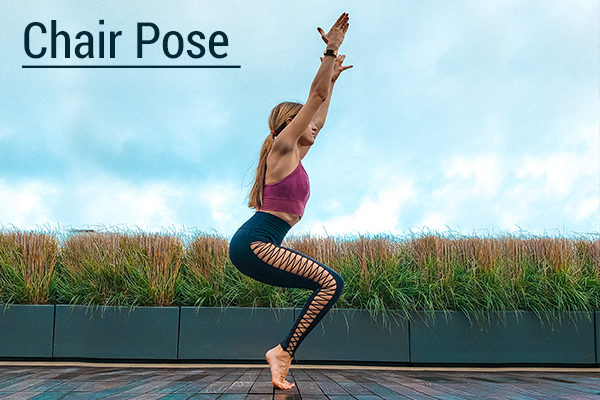
- Standing with your feet together, bend your knees and lower your hips toward the ground, like you are trying to sit into an imaginary chair behind you. Keep your back straight and strong.
- On inhale, reach your arms over your head, stretching your entire torso. Keep your an s away from your ears and allow your neck to stretch out, eliminating any tension.
- You can clasp your palms together in “prayer” form or keep them apart, fingers stretched out and facing each other. If bringing your palms together causes you to lift your shoulders toward your ears, separate them and focus on creating space instead.
- Keep pushing your knees together and spiral your thighs inward, causing your glutes to fire up. Dig your heels into the floor and focus on aligning your knees right over your ankles. This will prevent any knee injury or tension.
- If you are not sure whether your knees are where they should be, gaze toward your feet. If you cannot see them, that means you are too far forward. Shift your hips back and sit lower.
- With every inhale, focus on stretching out your spine, from your tailbone to the crown of your head, and with every exhale, try to sit lower and deeper.
- Breathing fully, keep your abs activated, so you avoid any pressure on your lower back. Your legs will be burning, and you will be creating quite the heat.
- Stay here for 3-5 long breath cycles or choose to advance it even further by lifting your heels and getting your quadriceps to work even harder.
- On your last exhale, extend your legs and come back to the Mountain Pose (Tadasana).
The Chair Pose, also known as the powerful pose or fierce pose, emanates from the Ashtanga Sun Salutation B, which is meant to build heat and prepare you for your practice.
This pose is safe for everyone. However, if you have knee problems and lower back issues, you should not go too deep, and you need to work on activating your abs even more. If your knees hurt when pressed together, place a pillow in between, but keep squeezing, as that is how the fire is born.
2. Warrior I
The first strong standing pose of the traditional yoga sequence, Warrior I builds strength, improves mobility, stretches out your upper body, and creates heat the moment your second inhale comes around.
How to do Warrior I:
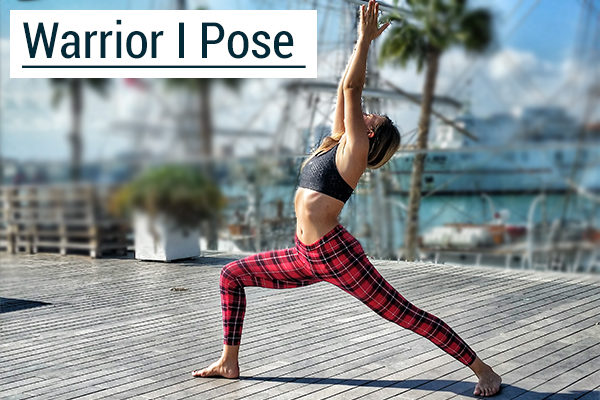
- Starting in a Downward-Facing Dog, lift your right leg and step in between your hands, rooting it into the ground.
- Spiral your left heel down in line with your right and keep your toes facing the left upper corner of your mat, creating a 45° angle.
- With both feet firmly pressing into the ground, bring your body up on inhale, bending your right leg in the process and keeping the left extended.
- Make sure your right knee follows the line from your hip straight forward and does not open up or fall in. Keep your knee aligned right over your ankle and sit low, trying to get your thigh as parallel to the floor as possible.
- Activate your left quadriceps and keep your leg extended without locking your knee out. Your hips should be facing forward, and this is where the challenge of this pose starts to show.
- Due to the sedentary lives we all lead, our hips are pretty tight and closed up, so squaring them off is not accessible to most bodies. If you are finding this really hard, separate your feet into a wider stance. Doing so allows your hips to shift and gives your lower back some space.
- On inhale, reach your hands over your head and send your shoulders away from your ears. Once again, you can choose to clasp your palms together or keep them shoulder-width apart, depending on your neck and shoulder flexibility.
- Activate your core, stretch your tailbone toward the floor, and close up your ribcage, feeling a lift in your chest and elongation in your lower back at the same time. You can choose to gaze up if it is okay for your neck or look straight forward and find a focus point on the tip of your nose.
- With every inhale, try to elongate your spine even more. And with every exhale, bend your knee a bit lower, activate your left quad a bit more, and try to bring your hips into a perfect line.
- Stay in Warrior I for 3–5 long breath cycles. On your last exhale, place your hands back down into the floor, lift your left heel, and step your right leg back to meet your left. Then, choose to go through a full Vinyasa or push back to a Downward-Facing Dog, where you will reset before doing the same thing on the other side.
Warrior I may seem like an easy pose to an outsider, but it is a powerful pose that even advanced students find intimidating, especially after a long day spent sitting at work or on a cold winter morning.
If you have issues with your lower back, always keep your stance separated and focus on breathing and extending your spine more than pushing your hips in one line.
If you have neck issues, do not let your head fall back and keep it straight. If you have issues with your knees, do not force going deeper than you feel safe doing.
3. Warrior II
Following Warrior I, Warrior II is an even more powerful pose. It gets your hips to open up, brings your heart rate up, and allows the heat and energy to reach every cell.
The best way to enter Warrior II is from a strong Warrior I, as your legs are already warmed up and ready to build even more heat. After your last inhale, exhale and slide your front foot into Warrior II, widening your stance.
How to do Warrior II:
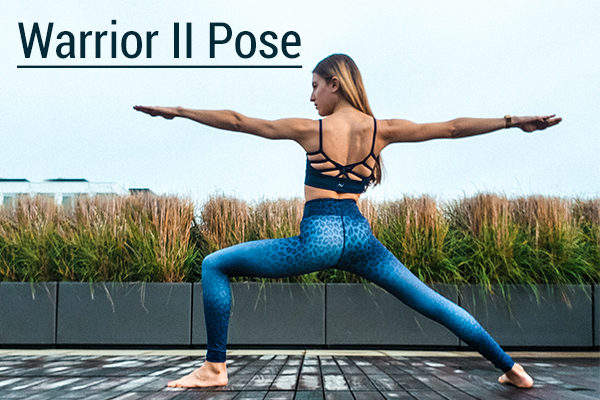
- Open your hips to the side and shift your back toes toward a 90° angle (instead of the 45° in Warrior I). Make sure your front knee stays straight and strong, and keep it from falling inward or rolling open, as that is the most common alignment issue people face.
- Once again, your knee needs to be right over your ankle and not over your toes, as you want to avoid any unnecessary ligament stretching.
- Stretch your arms to the front and back, straight and strong, energy running all the way through the fingertips.
- Relax your shoulders and give your neck some space, stretching it and allowing the blood to flow freely.
- Your gaze, soft but determined, is right over your front arm. Having a good focus (drishti) is important, as it will keep you in the present moment, scanning your body and its alignment with every breath.
- If you feel yourself leaning forward and getting into your front hip crease, pull your torso a bit toward the back, as you want to have your shoulders right over your hips. Tuck your pelvis and elongate your tailbone, extending your lower back and activating your abs.
- Feel your heels digging into the ground and creating a sensation of wanting to crumble up your mat with the force between them.
- On inhale, extend your spine and, on exhale, bring yourself lower into the pose, trying to get your front thigh parallel to the ground as much as possible, while keeping the back leg straight and strong.
- Stay here for 3–5 long inhales and exhales.
- On your last exhale, cartwheel your hands into the floor, lifting your back heel and stepping your front leg to meet your left. Before repeating it all on the other side, choose to flow through your Vinyasa or simply push back into a Downward-Facing Dog.
Warrior II is a very important pose in traditional yoga practice as it builds the strength and stamina needed to perform an array of other yoga poses. It tones both legs, stretches out the spine, opens the hips, and brings the heart rate up, increasing your body temperature and keeping you warm.
This pose is safe for everyone. However, if you have knee problems, make sure they are not going too deep and past their limits.
If you are having lower back problems, work on tucking your pelvis and activating your abs even more than you think is necessary. Also, avoid going deep if it does not feel good.
Final Word
These are some of the most powerful yoga poses that will definitely keep you warm throughout the cold winter months, and you do not need to be an expert to perform them. Focus on your breath and proper alignment, and feel your body warm up from the inside out.
- Was this article helpful?
- YES, THANKS!NOT REALLY