In this article:
There are so many reasons that your back can hurt. Not every person is the same and not every back problem is the same. Thus, there is no one-size-fits-all way to treat back pain, but the methods discussed here are very effective for the majority of patients.
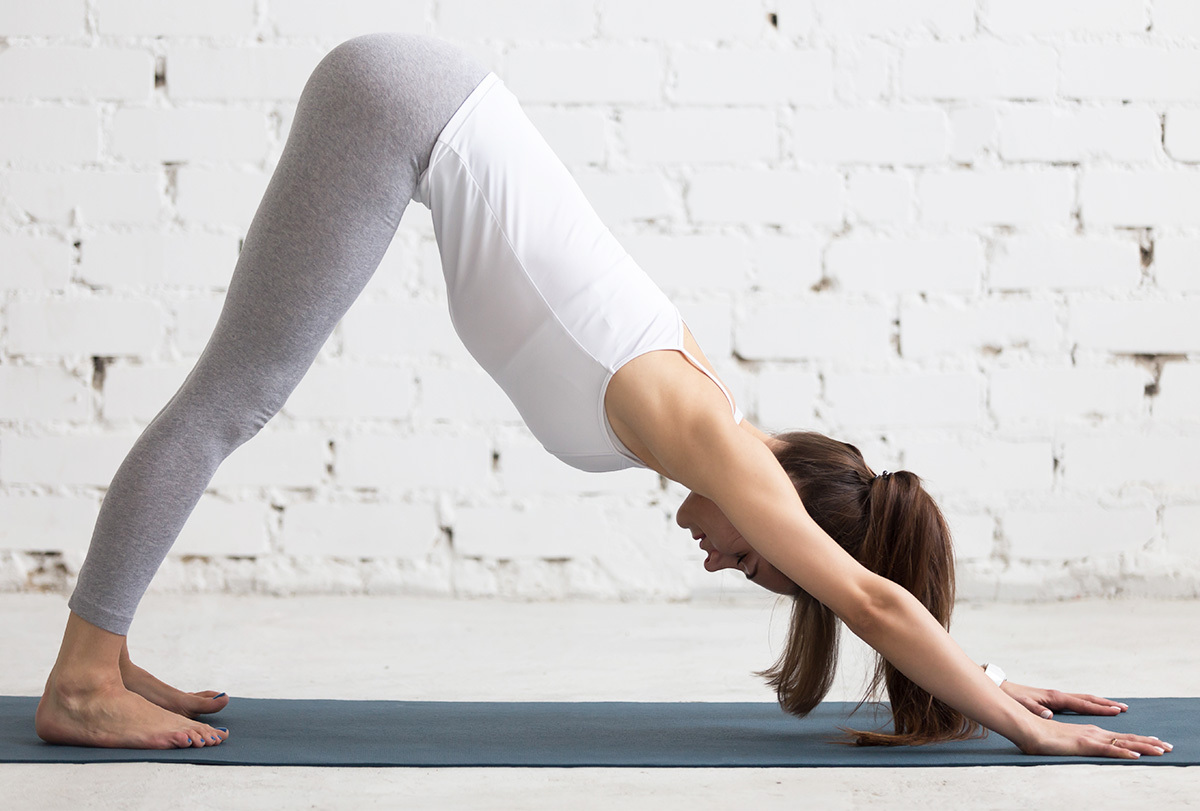
Back pain usually can be made to feel better by moving the spine and back muscles in a certain direction. This is called directional preference, which is the principle behind the exercises that are presented in this article.
A doctor absolutely cannot and should not give you generic exercises to help your back pain without first thoroughly evaluating how your pain responds to different positions and movements.
Sometimes, problems in the spine will not hurt your back but the pain and other strange symptoms will be felt in areas that are far from your back. This is why your symptoms must be evaluated by a healthcare professional.
What Causes Back Pain?
The intervertebral discs are malleable.
Picture a jelly doughnut – an inner layer of gelatinous liquid surrounded by a more solid matter, both of which have very few nerve endings. That is what the intervertebral disc is like, a bunch of jelly doughnuts in between each vertebra.
In most cases of back pain, the “jelly” on the inside of the disc moves around, deforms the shape of the disc and touches the nerve endings or the nerves. Poor posture and frequent bending over-compress the front of the disc and push the jelly to the back of the disc.
In a condition called sciatica, the jelly puts pressure on the sciatic nerve, which runs the length of your entire leg. Sciatic pain is felt down the back of your leg. In severe cases, the outer part of the disc tears, and then the jelly flows out of the disc.
Posture, Posture, Posture!
If you always keep your spine straight, the jelly has a slim chance of getting moved around. Hence, you have a low risk of back pain and other related disorders.
Having proper posture will do wonders for your body. A good piece of advice is to “sit as you stand.” This means that when you are sitting, your spine should be as straight as when you are standing.
Preventing Back Pain With Yoga
Yoga helps improve the flexibility of your spine and overall body. However, yoga asanas should be used as a preventive measure rather than an antidote for back pain. Thus, if you already have lower back pain, yoga is most likely not the answer.
The idea is to do yoga regularly when you are still pain-free to keep your spine limber, thereby minimizing the risk of a displaced disc or back injury in the future.
1. Downward-Facing Dog Pose
Downward-Facing Dog is a classic yoga pose that primarily targets the large muscles that form your lower back (back extensors). Thus, it helps support, lengthen, and strengthen your back muscles.
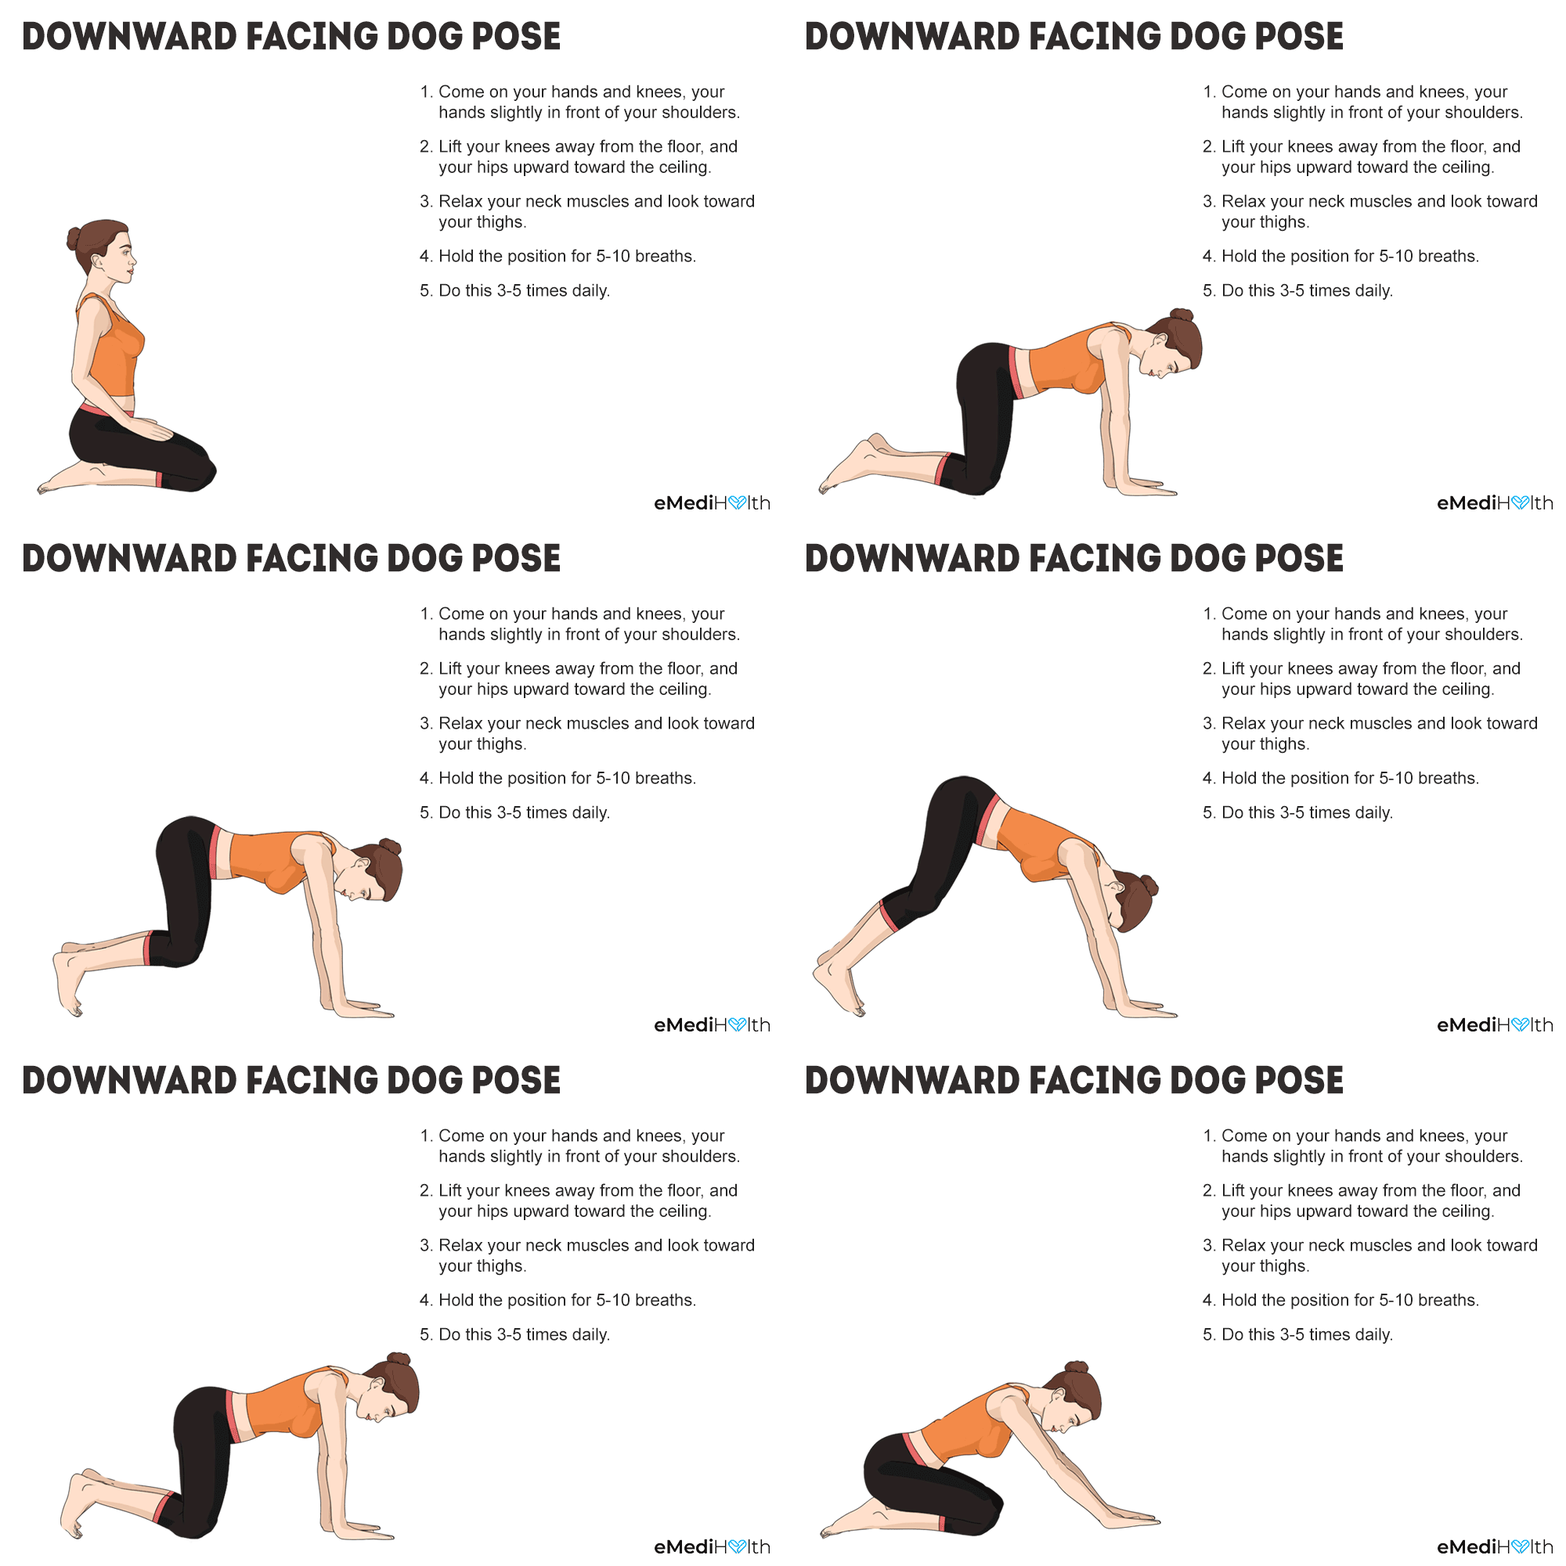
- Begin on your hands and knees, your hands slightly in front of your shoulders.
- Lift your knees away from the floor (as if going into a push-up) and your hips upward toward the ceiling.
- Relax your neck muscles and look toward your thighs.
- Hold this position for 5–10 breaths.
- Gently release to your starting position.
- Repeat the pose three to five times daily.
Caution: Skip the pose if you have severe carpal tunnel syndrome or are in late-term pregnancy. Also, those with an injury to the back, shoulders, or arms must not practice this pose.
2. Child Pose
The Child pose is an active stretch that helps elongate and align the spine.
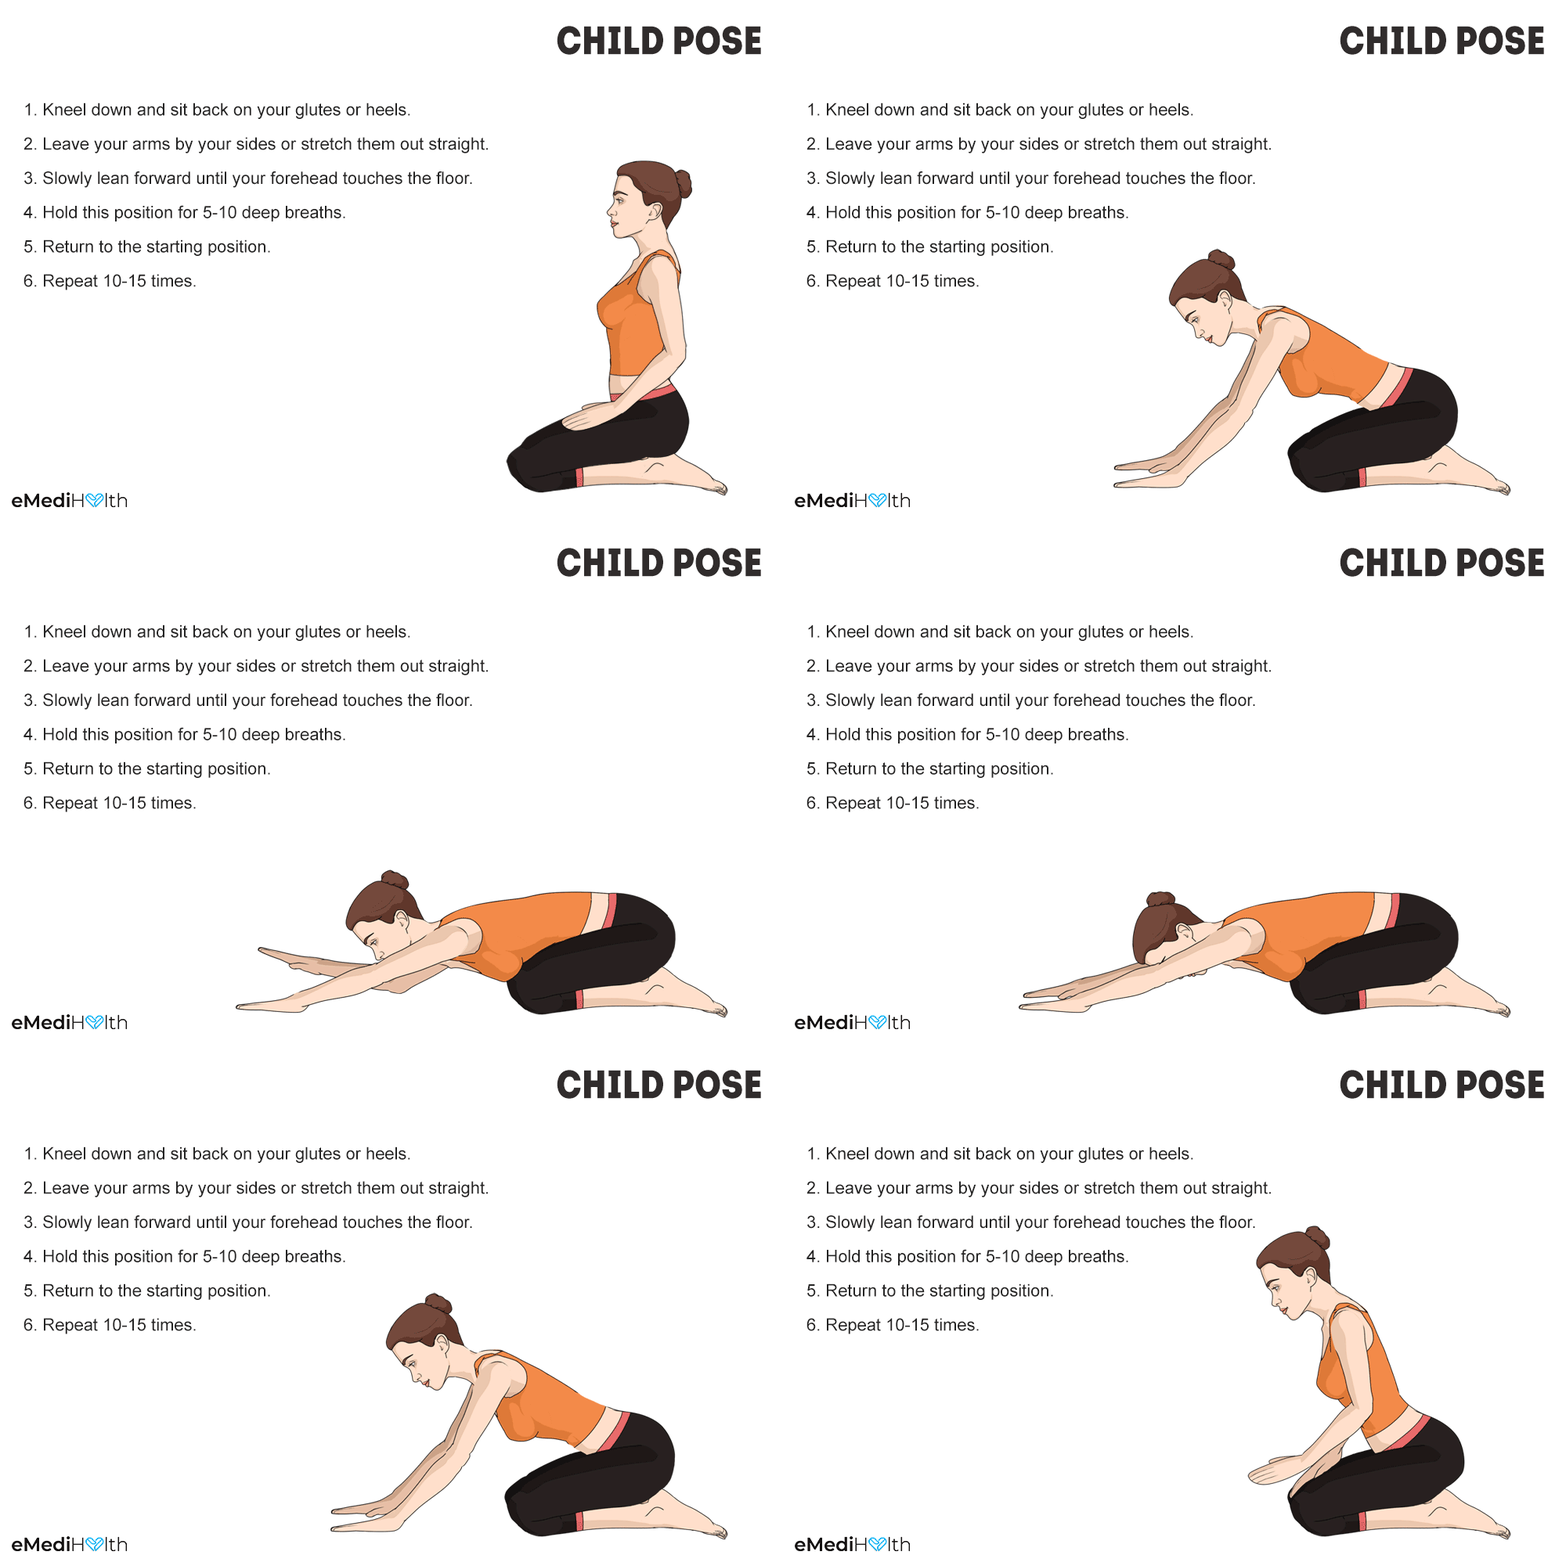
- Kneel down and sit back on your glutes or heels.
- Leave your arms loose by your sides or stretch them out straight.
- Breathe out and slowly try to bend forward. Carefully lean forward until your forehead touches the floor. Make sure your torso rests on your thighs while you achieve the desired position.
- Hold this pose for 5–10 deep breaths.
- Slowly return to the starting position.
- Repeat 10–15 times for a good soothing stretch.
Caution: Pregnant women and those with recent or chronic injury to the knees should not practice this pose.
3. Cat and Cow Stretch
The Cat and Cow pose stretches the back and torso. This pose helps massage and loosen the muscles in and around the spine. It helps keep your spine limber and fluid.
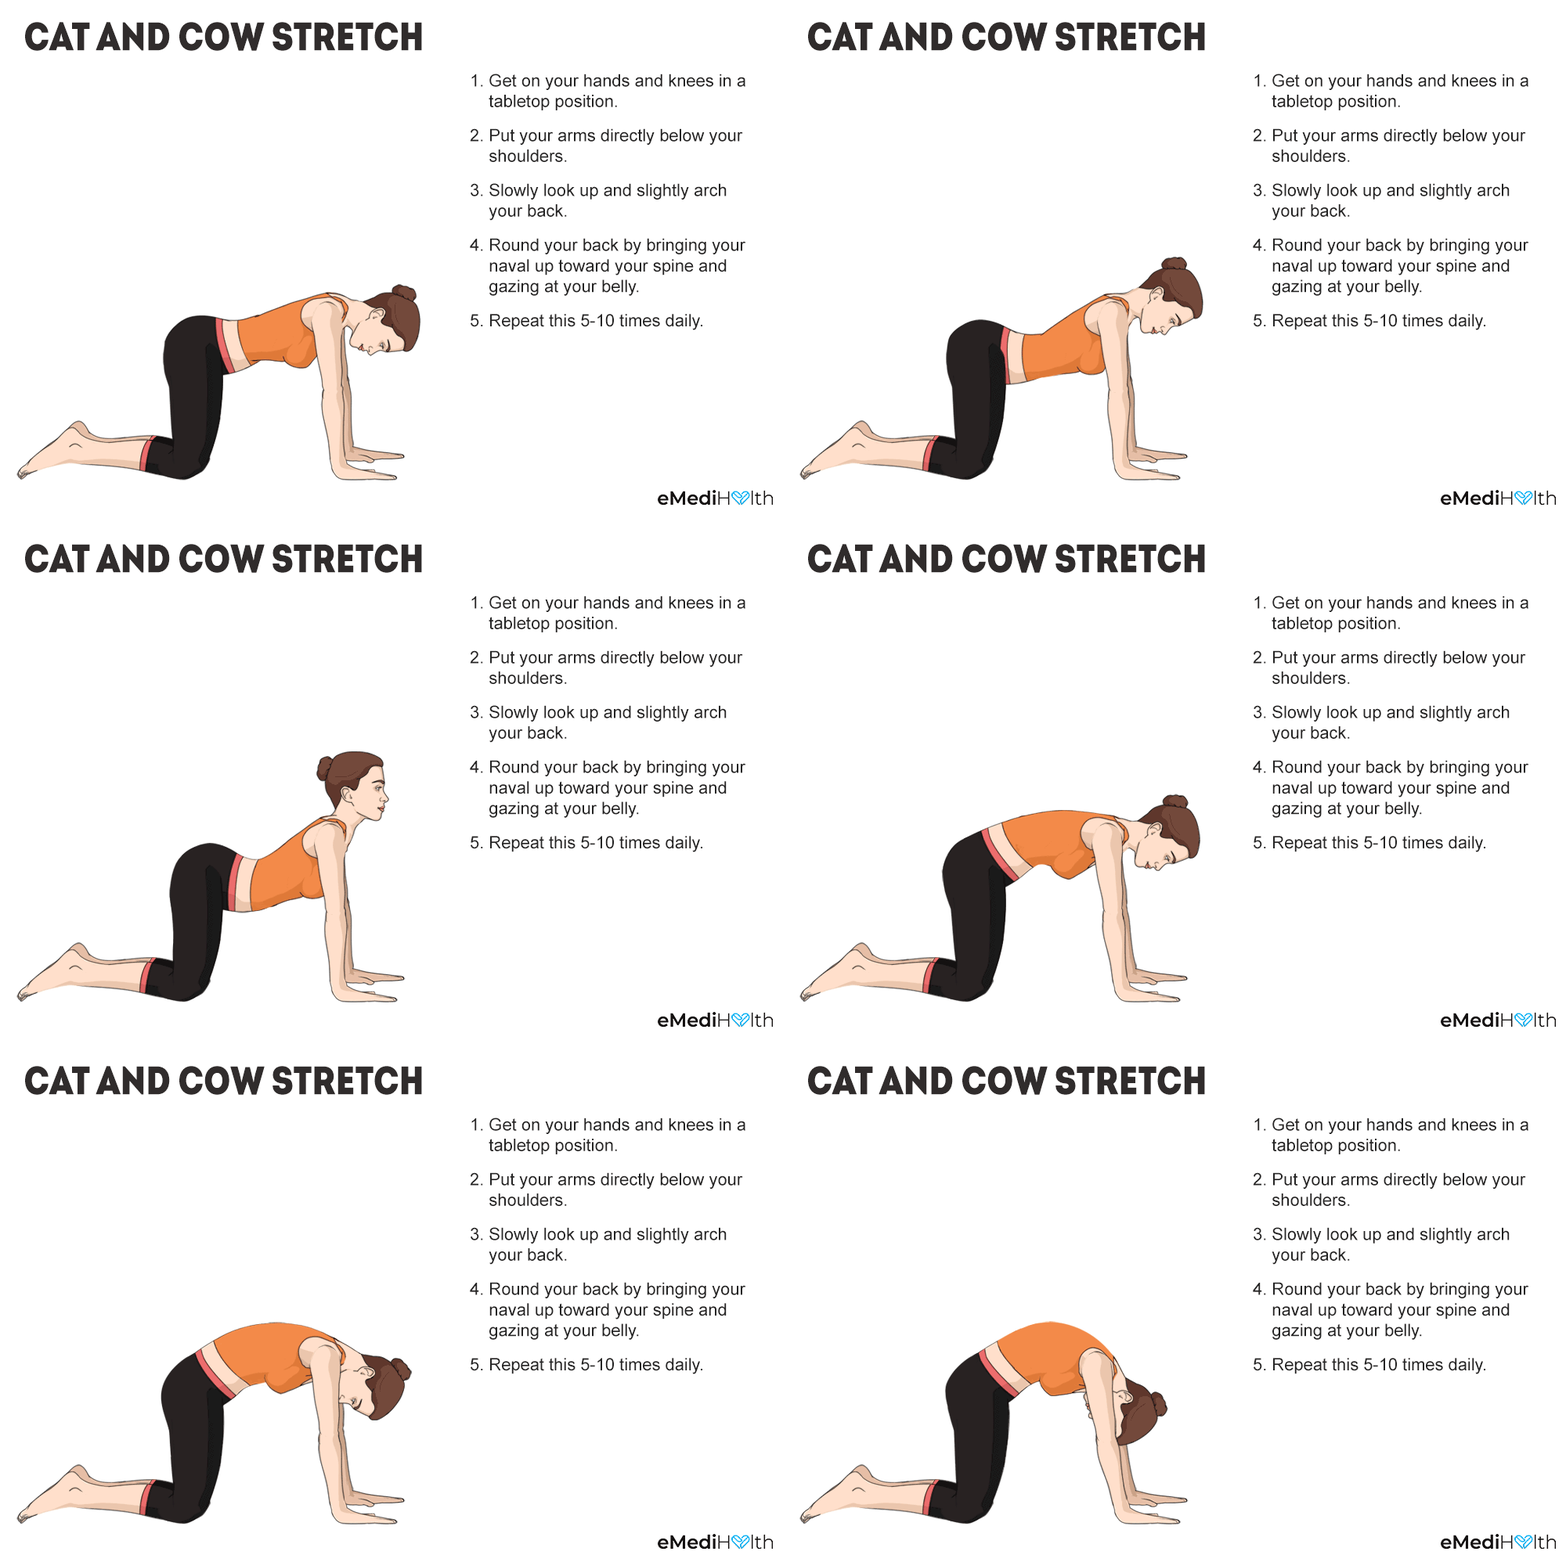
- Get on your hands and knees in a tabletop position.
- Position your arms directly below your shoulders, keeping them straight.
- Slowly look up, inhale, and slightly arch your back.
- As you exhale, round your back by bringing your navel up toward your spine and gazing at your belly.
- Repeat this 5–10 times, flowing from arching (Cat pose) to rounding (Cow pose).
- Do this daily to stretch your spine in both directions.
Alternating between the Cat and Cow poses helps ease tension and relax the muscles by bringing the spine into a neutral position.
Finish with the Child pose, which is a counter pose. To avoid overstraining, back-bends should always be followed by a forward bend.
Caution: Those with neck injuries should not drop the head forward or backward but instead keep it in line with the torso. Pregnant women and those with back injuries should skip the Cat pose.
4. Half Lord of the Fish Pose
The Half Lord of the Fishes pose massages both the superficial and deep muscles of the spine and adjusts distorted vertebrae, thus increasing spinal circulatory activities.
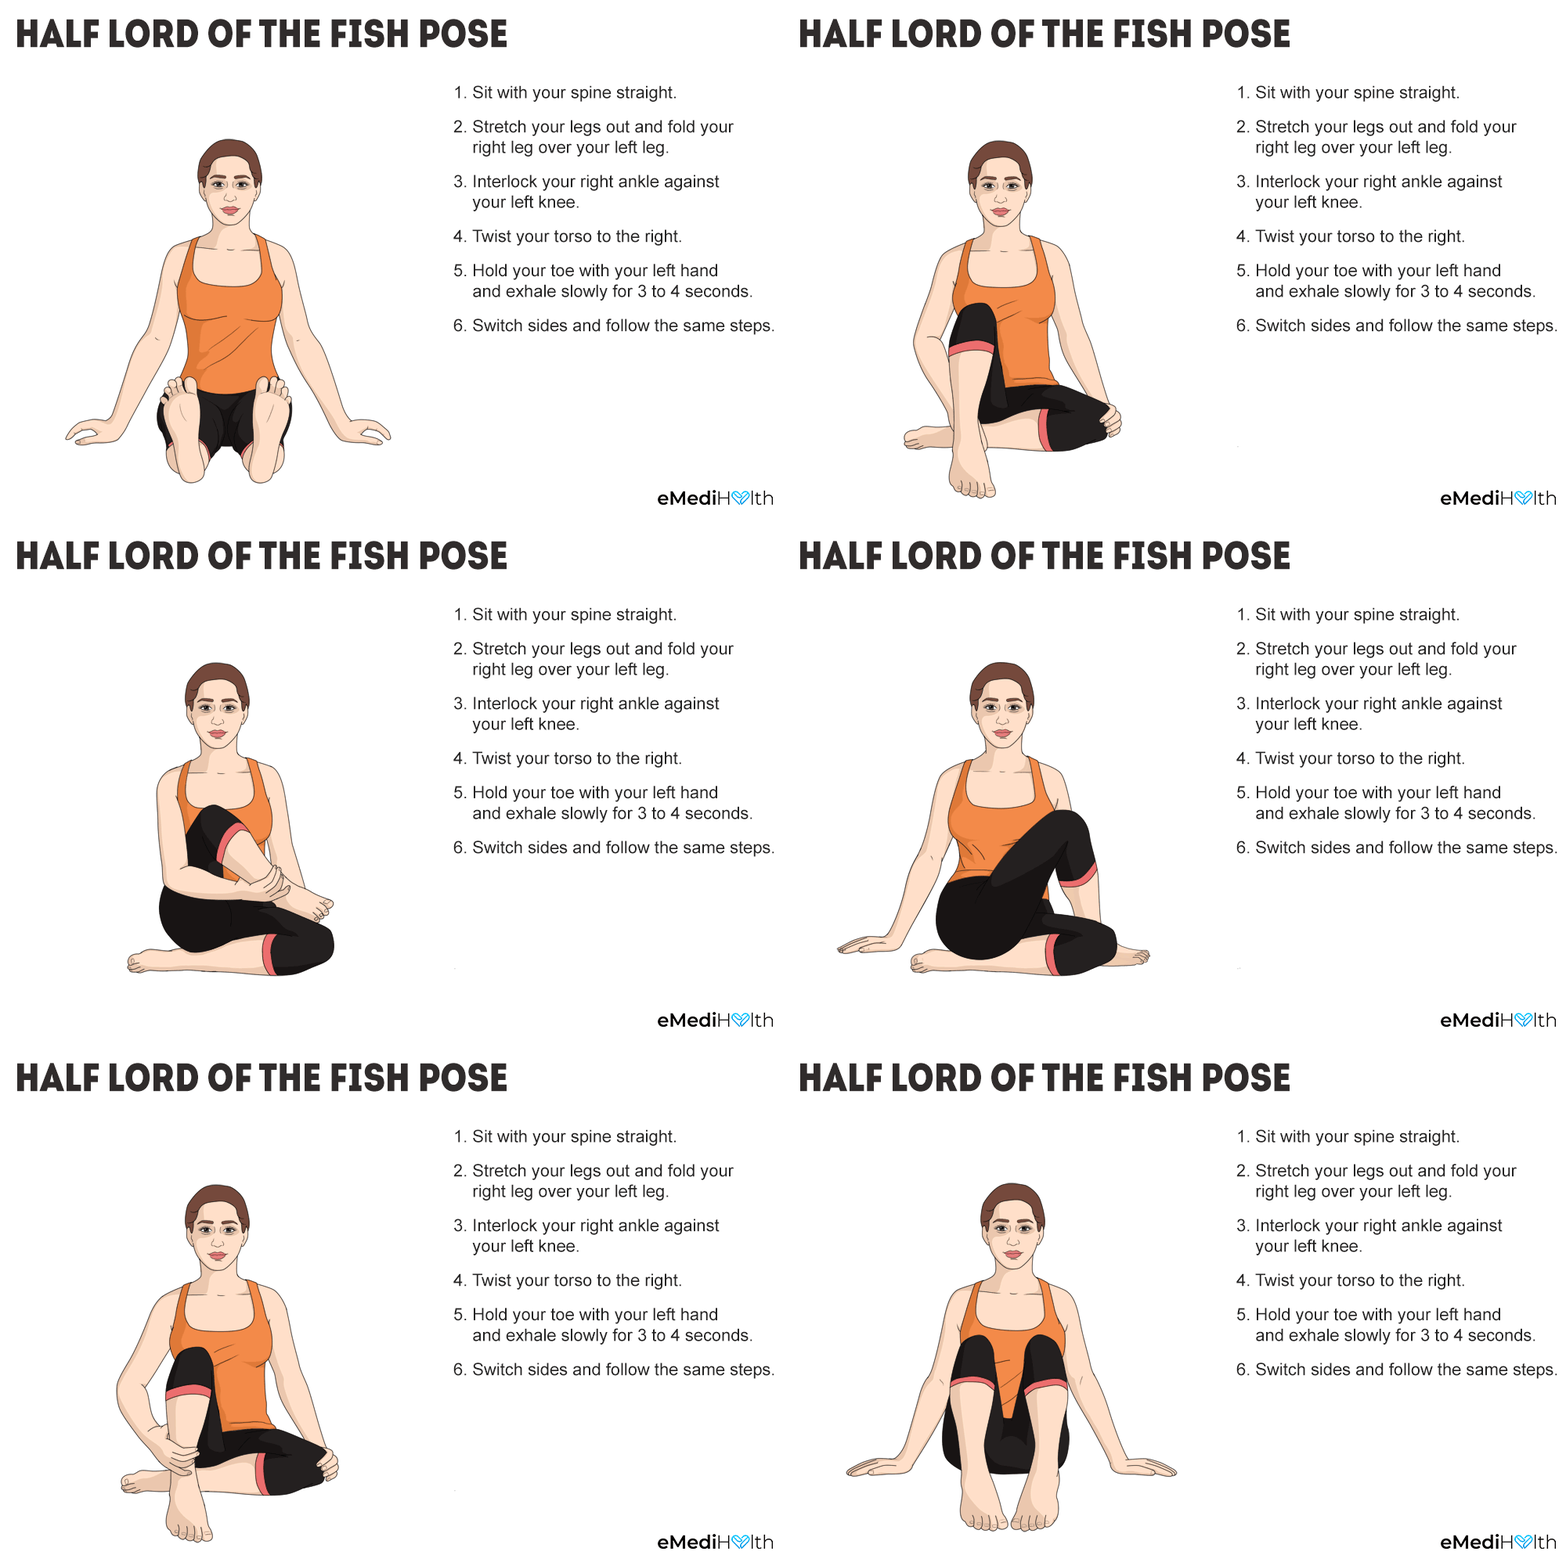
- Sit with your spine straight.
- Stretch your legs out in front of you.
- Fold your right leg over your left leg (left heel against the right perineum).
- Interlock your right ankle against your left knee.
- Twist your torso to the right.
- Hold your toe with your left hand and exhale slowly for 3–4 seconds.
- Switch sides and follow the same steps.
Caution: Those with a spine or back injury must practice this pose only under the supervision of an expert.
5. Standing Forward Fold
Also called the Upward Forward Bend, the Standing Forward Fold is another effective yoga pose that helps lengthen the hamstrings and back muscles, thus reducing tension in the vertebrae and easing any pain.
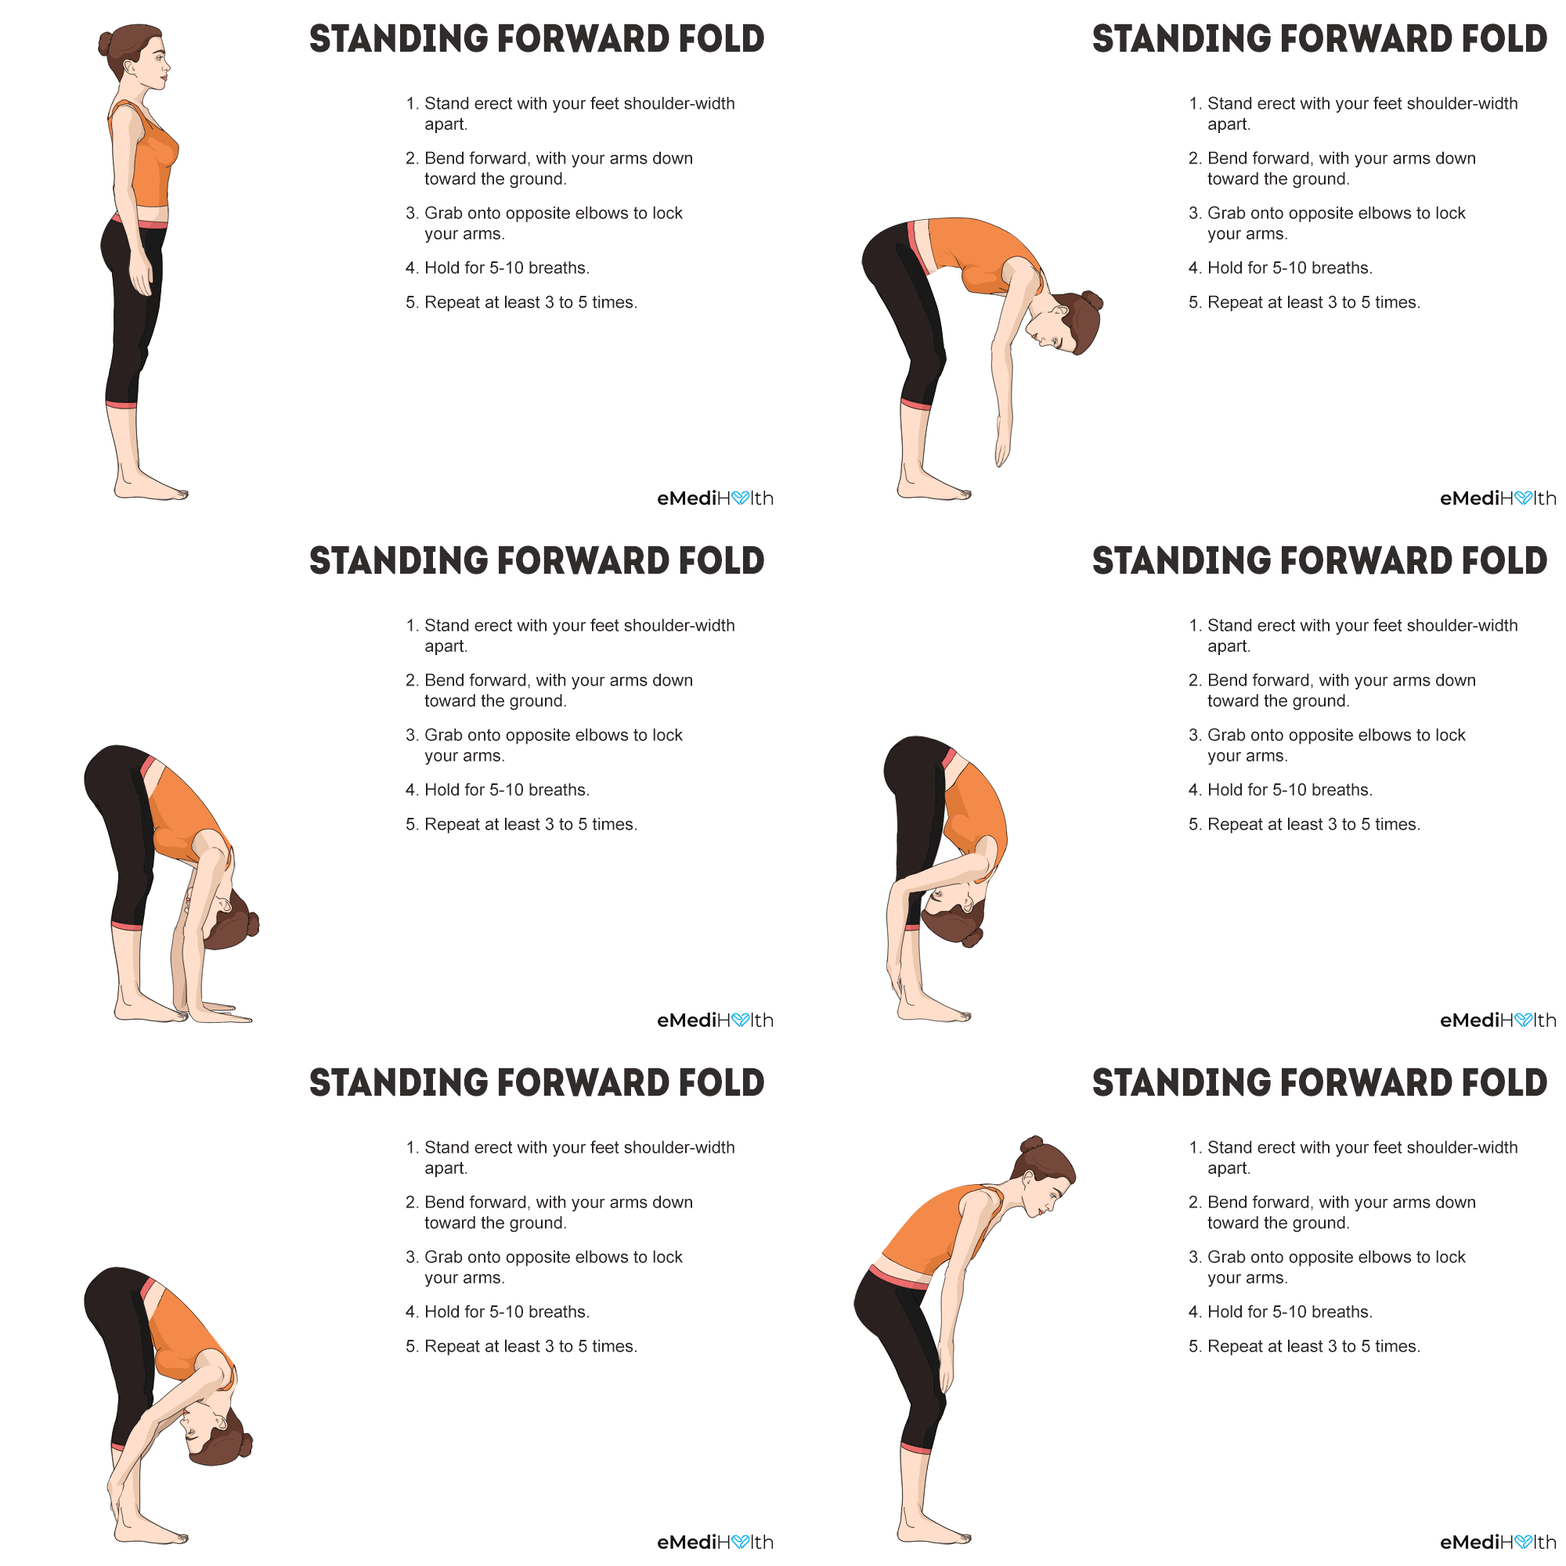
- Stand erect with your feet shoulder-width apart.
- Exhale and gently bend forward, with your arms down toward the ground.
- Let your head hang and grab onto opposite elbows to lock your arms.
- Hold this position for 5–10 breaths.
- Repeat at least three to five times.
- Do this exercise once daily.
Make sure you do not bend your knees. Do not worry if you cannot reach the floor initially. Just stop wherever you feel a bearable stretch in your hamstrings.
Caution: Those who have had recent back or knee surgery must avoid this exercise.
6. Locust Pose
The Locust pose helps strengthen and lengthen the muscles around the spine (erector spinae and multifidus), thus correcting your posture and helping to reduce back pain. It also helps relieve sciatic pain.
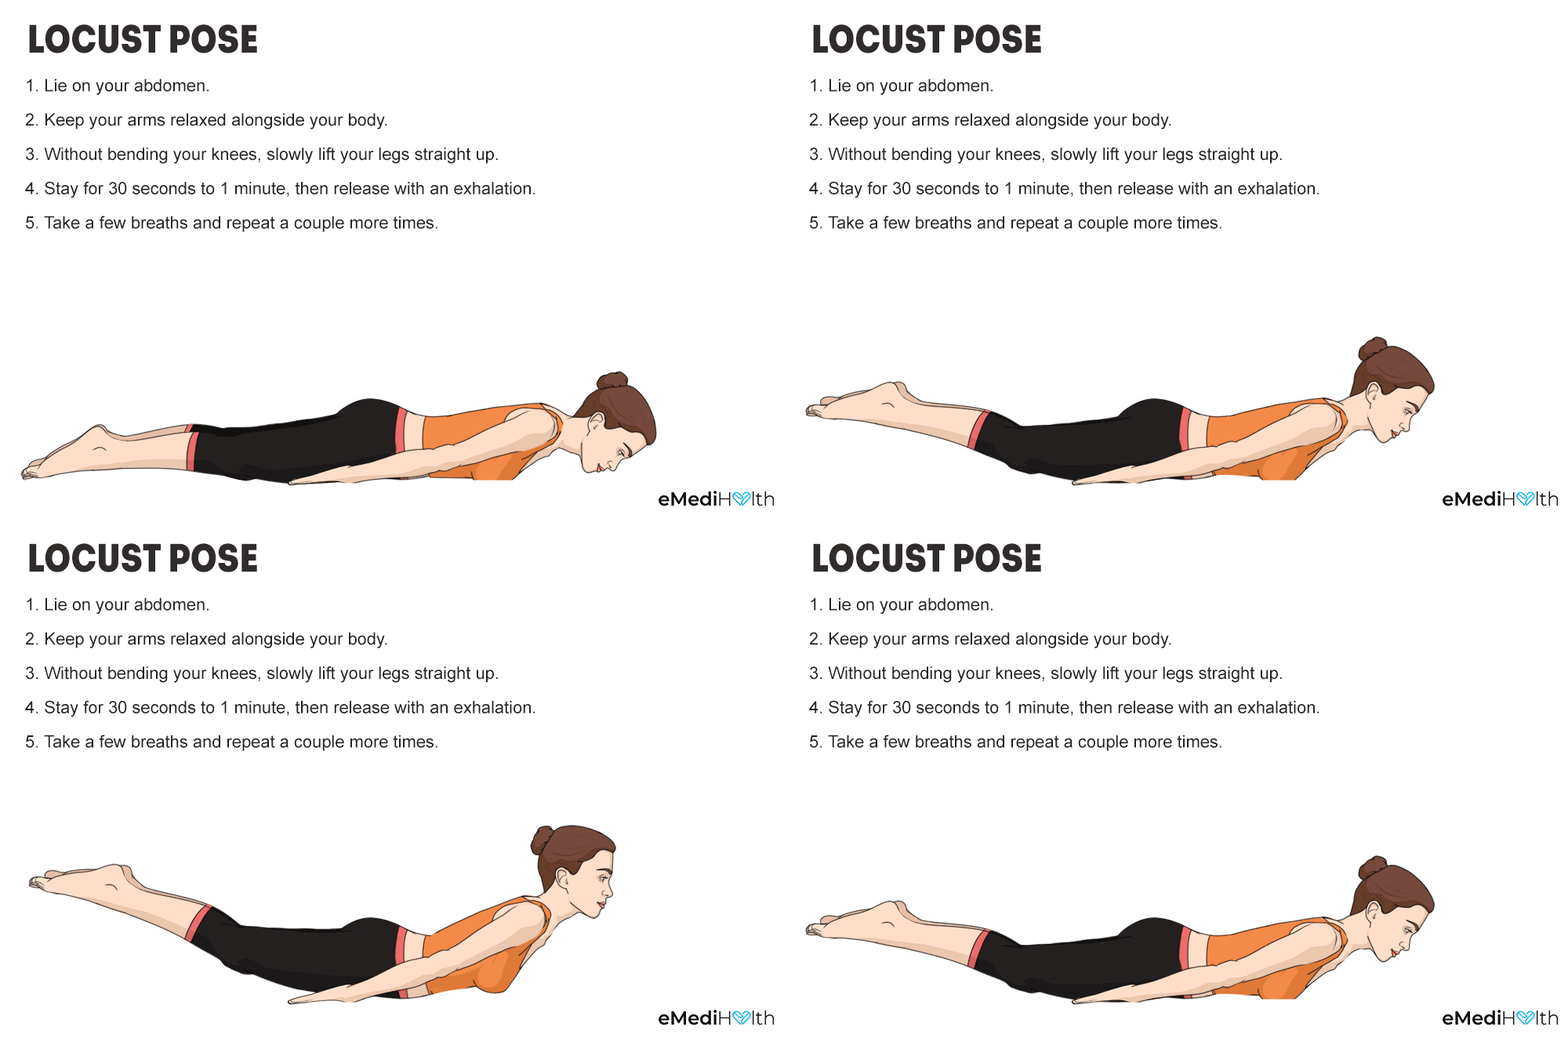
- Lie on your abdomen in a straight line, with your toes pointing toward the back.
- Keep your arms relaxed alongside your body, palms up.
- Exhale and slowly lift your legs straight up as far as possible. Make sure you do not bend your knees.
- Stay in this position for 30 seconds to 1 minute and then release with an exhalation.
- Take a few breaths and repeat one to two times more, if you like.
If you cannot do both legs together, you can start by lifting one leg at a time. After some practice with the alternating leg lifts, you can perform this pose with both legs together.
Caution: People with cardiac conditions and pregnant women must avoid this posture. Also, if you suffer from a neck injury, do not raise your upper body. Lifting the legs and keeping the rest of the body grounded will be effective.
7. Legs Up the Wall Pose
One of the most nourishing and calming poses, the Legs Up the Wall pose helps relax the lower back muscles. It also drains off excess stagnant fluid from the ankles and feet, thus soothing them.
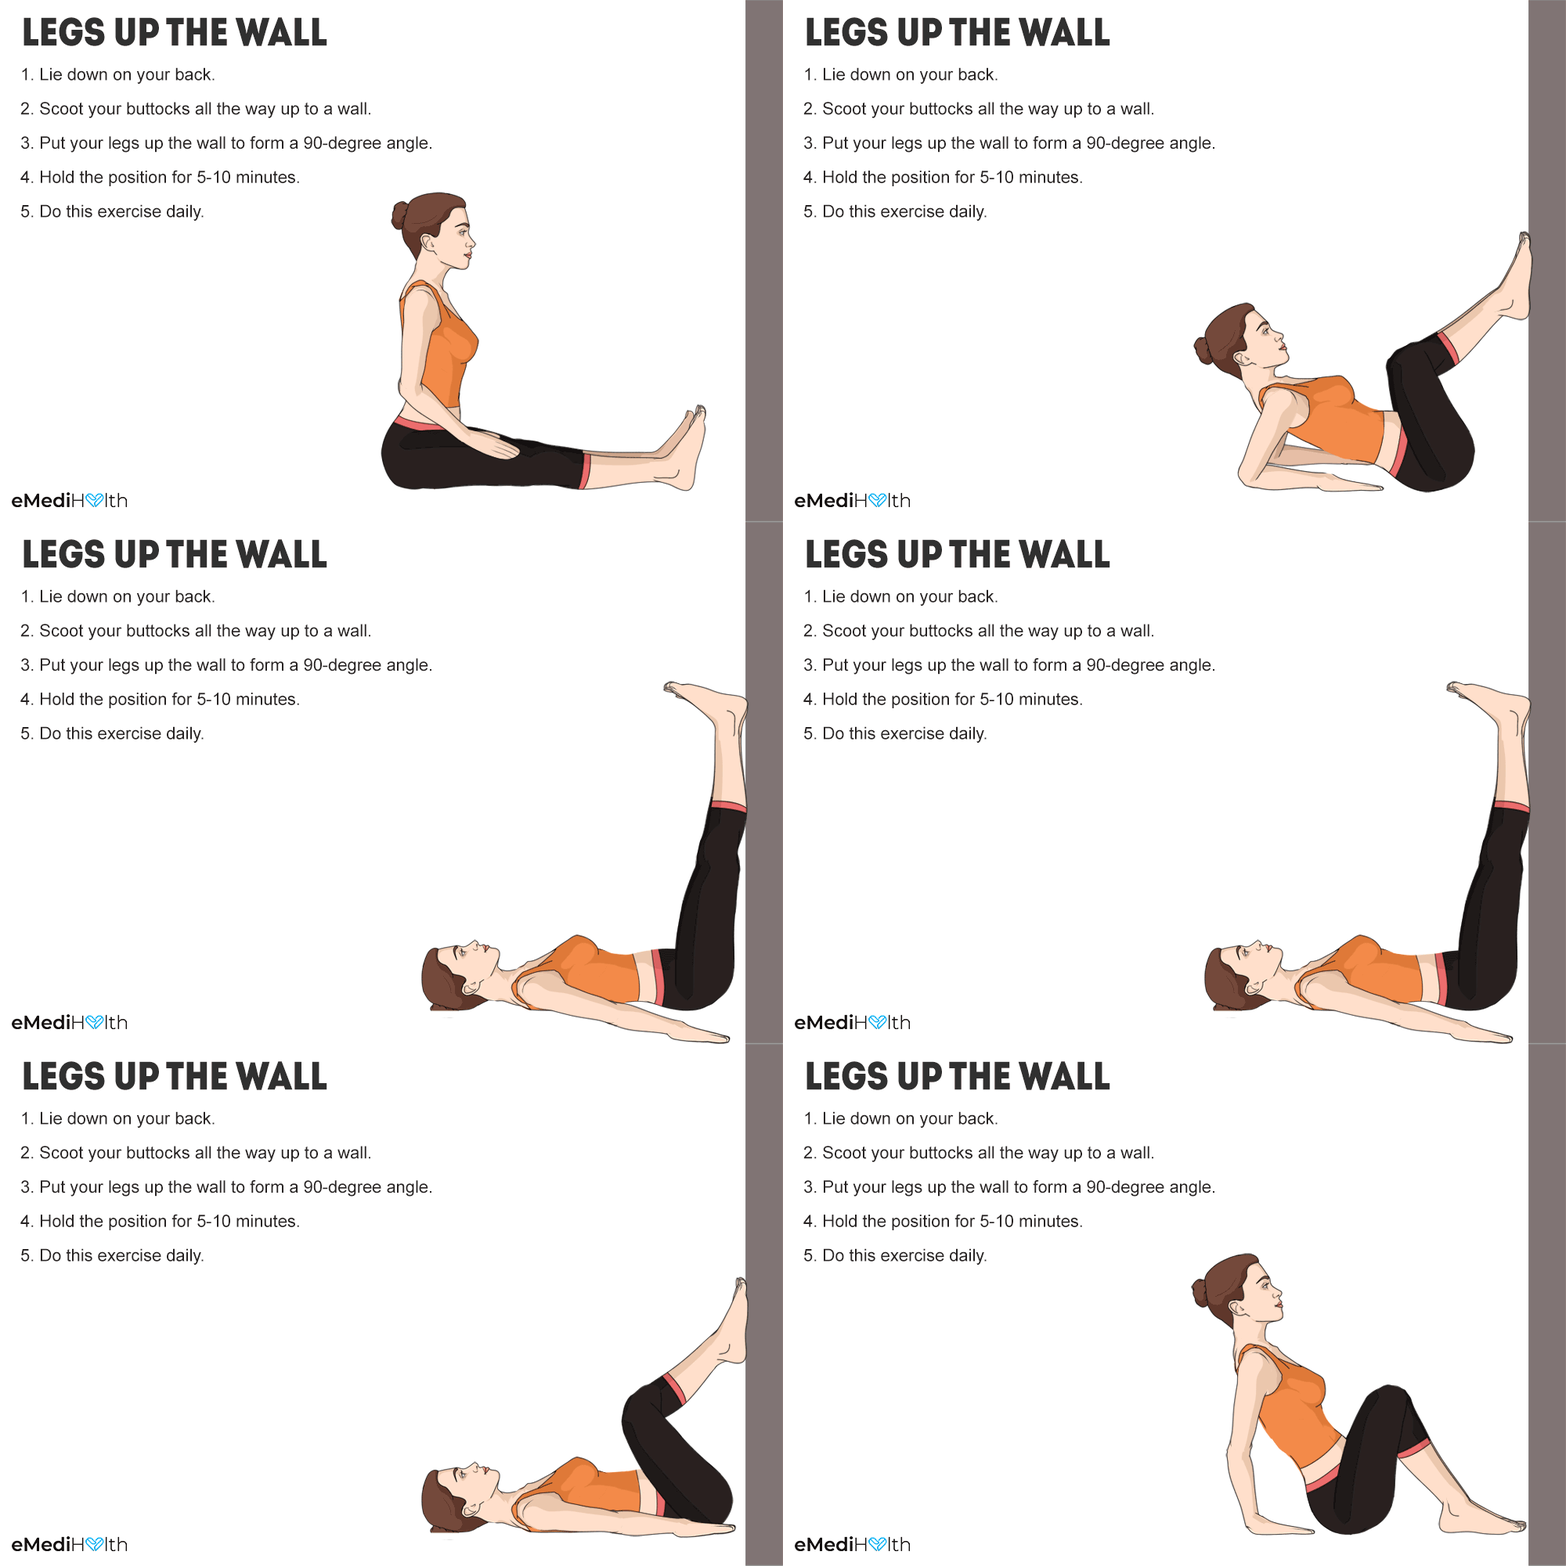
- Lie on your back.
- Scoot your buttocks all the way up to a wall, as close as you can.
- Swing your legs up the wall (feet pointed toward the ceiling) to form a 90° angle.
- Hold this position for 5–10 minutes.
- Do this exercise daily. You may place a pillow or cushion under your butt for comfortable positioning.
Caution: Menstruating women must avoid practicing this exercise. Those with severe eye troubles, such as glaucoma, must skip this pose.
8. Sphinx Pose
The Sphinx pose helps strengthen the spine, lower back, shoulders, and legs. It promotes blood circulation in and around the spine, thus improving mobility and relieving stress and pain.
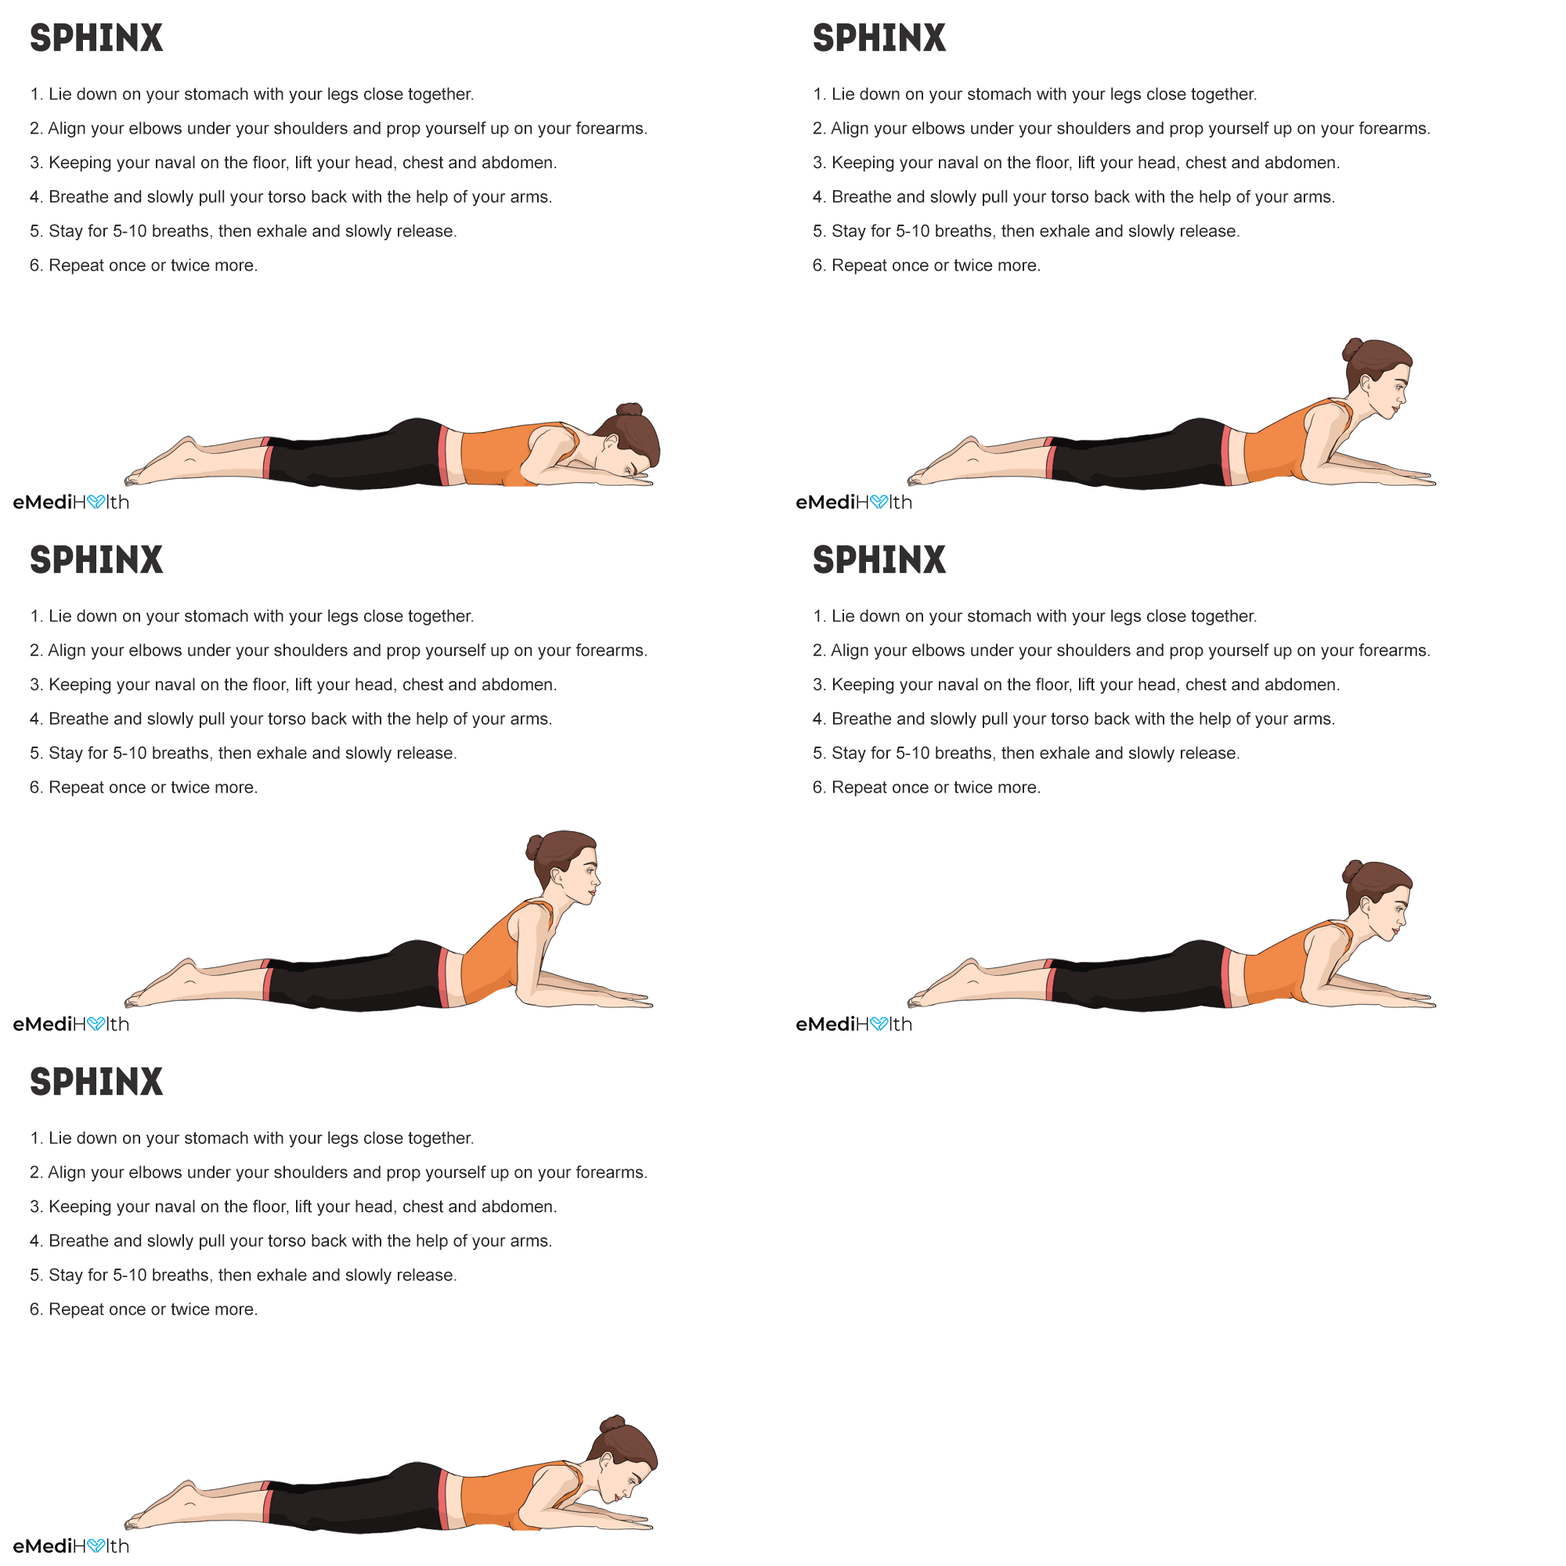
- Lie down straight on your stomach with your toes flat and resting on the floor.
- Align your elbows under your shoulders and prop yourself up on your forearms.
- Keep your legs close together, with your feet and heels lightly touching each other.
- Slowly, take a deep breath, and keeping your navel on the floor, lift your head, chest, and abdomen.
- Breathe and slowly pull your torso back with the help of your arms.
- Hold this pose for 5–10 breaths.
- Slowly breathe out and release your belly, and lower your torso, and head to the floor.
- Repeat this exercise once or twice more if you are comfortable.
Caution: Those with a chronic back injury and headache must not practice this pose.
9. Supine Hamstring Stretch
The Supine Hamstring Stretch is an effective exercise to help lengthen the thigh muscles to relieve the pressure off the lower back.
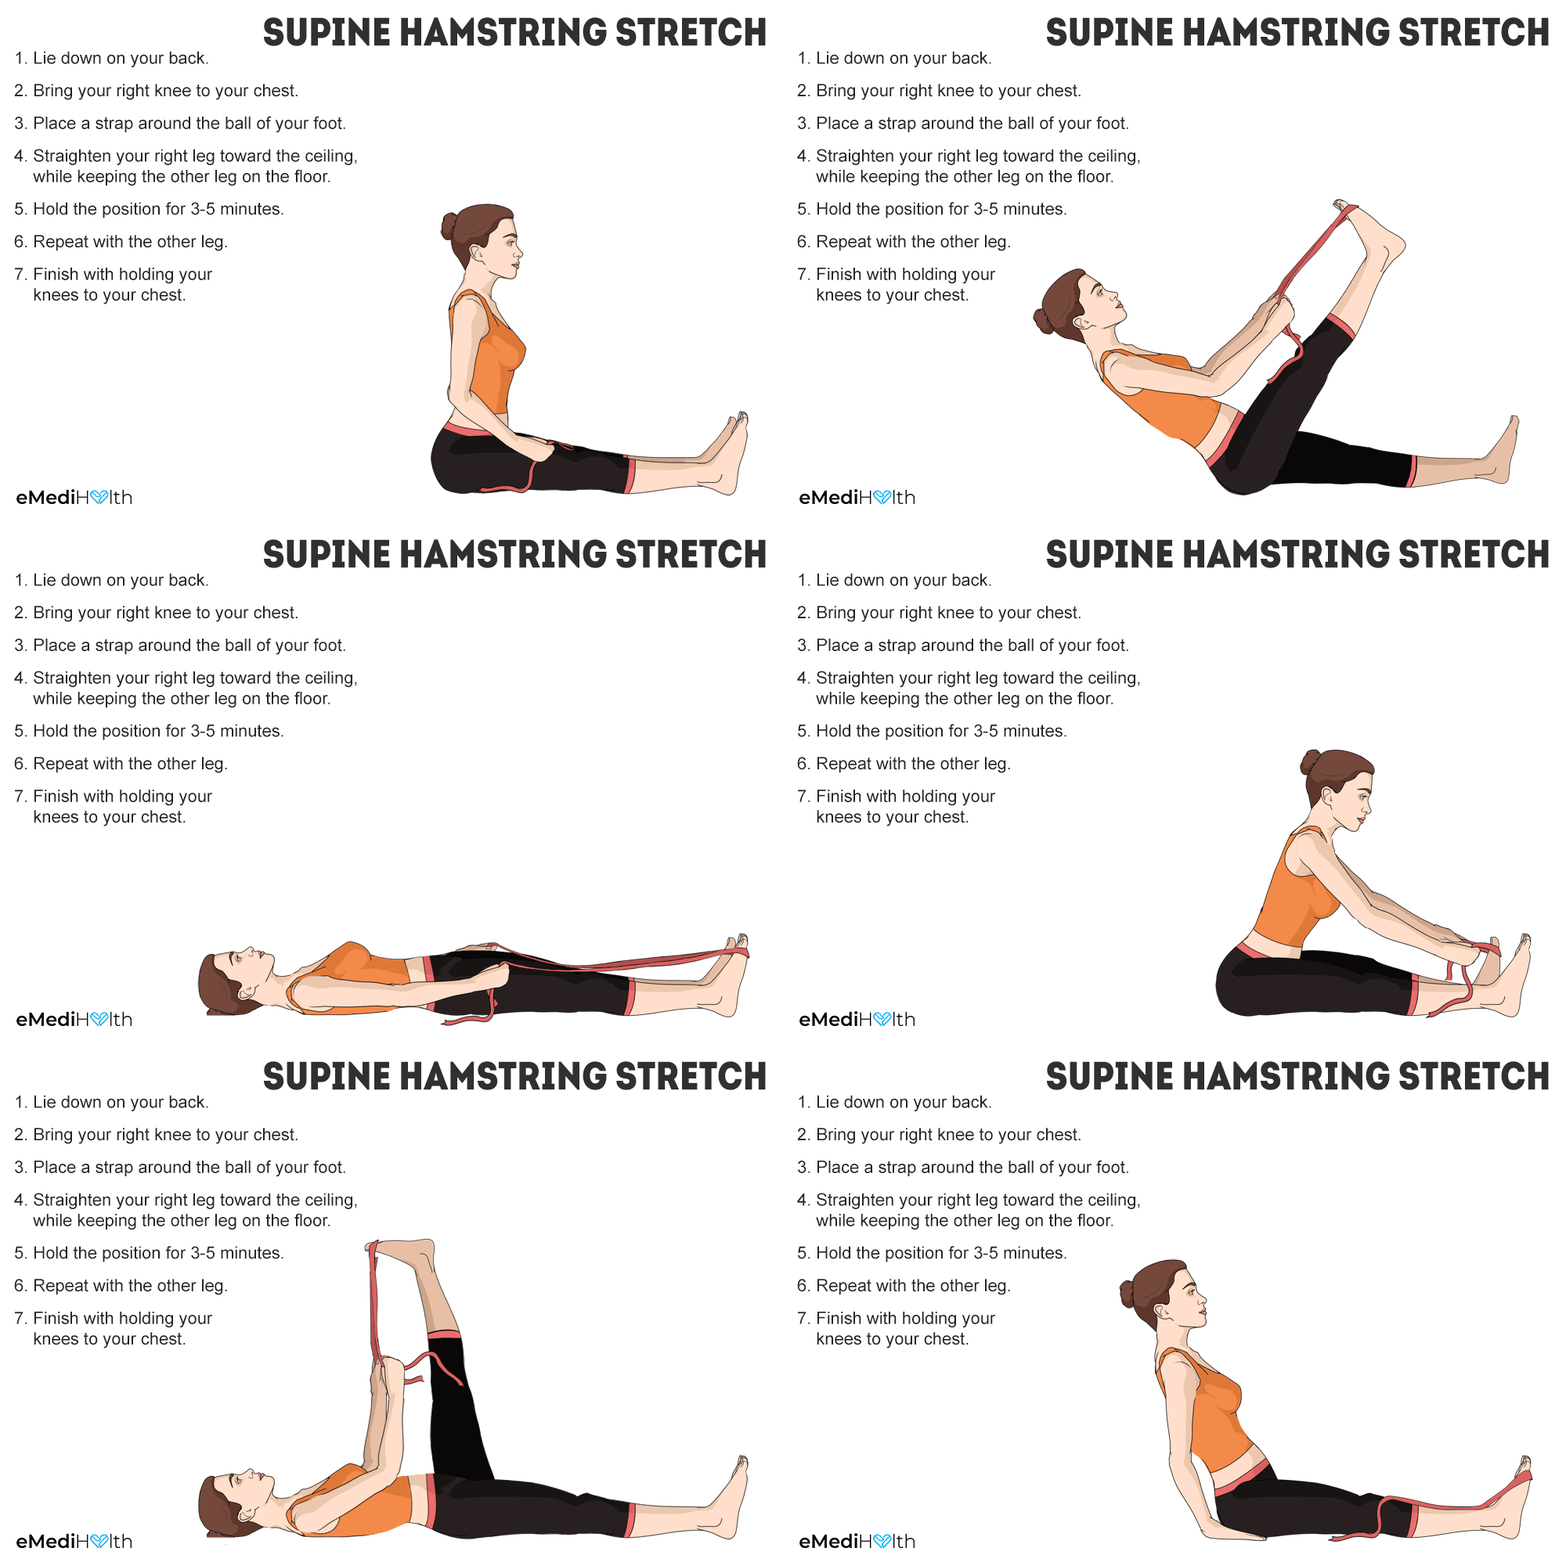
- Lie down on your back.
- Bend your right knee into your chest.
- Place a strap or a towel around the ball of your foot.
- Straighten your right leg toward the ceiling while keeping your left leg straight out on the floor.
- Press out through both heels.
- Hold this position for 3–5 minutes.
- Switch to the other leg and follow the same process.
- Finish with holding your knees to your chest.
If you feel a strain on your lower back, you may bend your left knee and place your foot on the ground in a resting position.
Caution: Those with chronic injury in the neck must avoid practicing this exercise.
10. Palm Tree Pose
The Palm Tree pose helps stretch the spine vertically, correcting your posture.
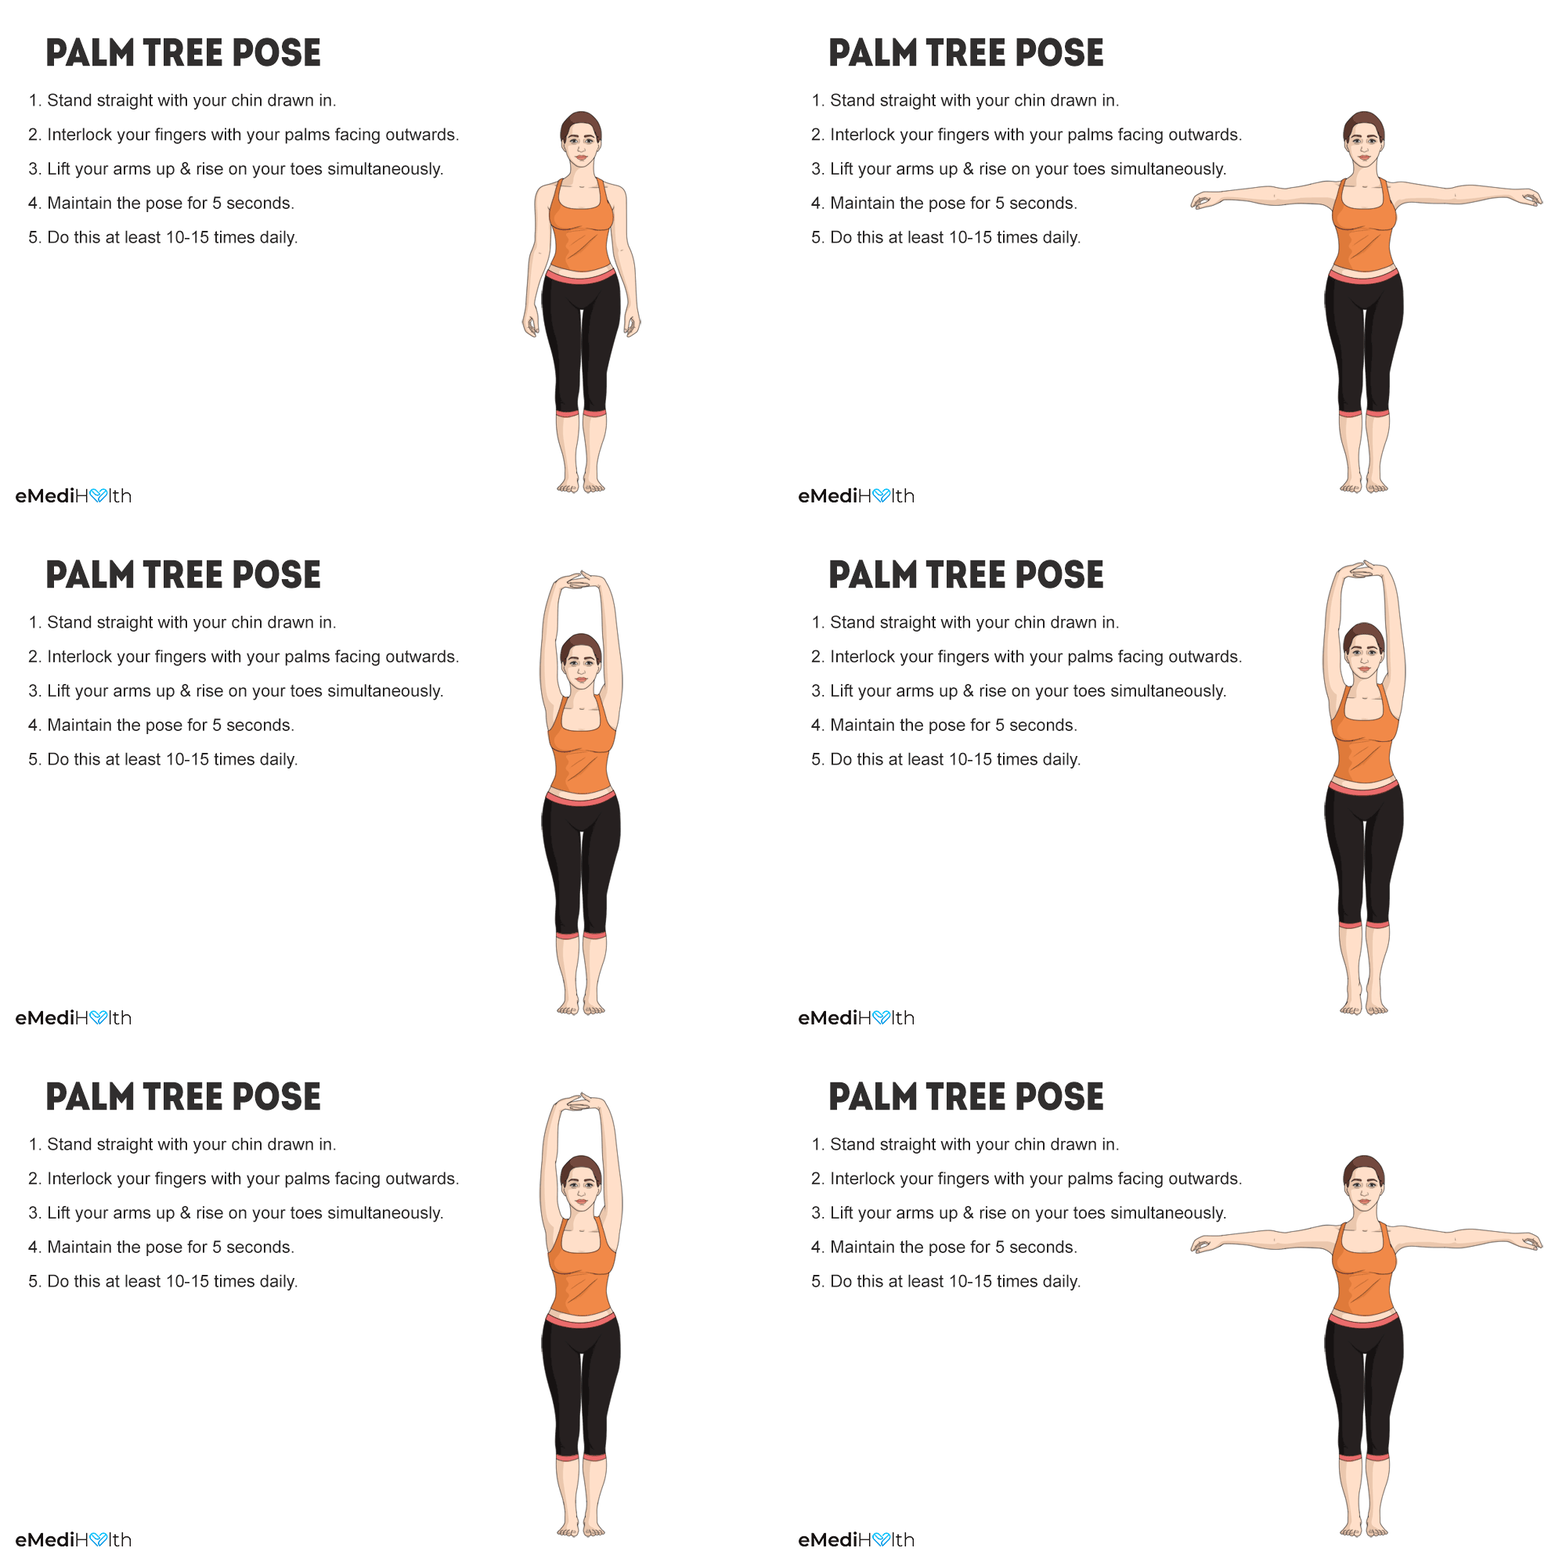
- Stand erect with your feet shoulder-width apart.
- Keep your spine and neck straight and your chin drawn in.
- Interlock your fingers with your palms facing outward.
- Raise both your arms and heels up simultaneously.
- Rise on your toes and inhale for 2 seconds.
- Maintain the pose while holding your breath for 5 seconds.
- Rotate your arms backward and downward.
- Simultaneously, lower your heels and return to the starting position.
- Do this at least 10–15 times daily, depending upon your ability.
You can also twist and bend on both sides, keeping your torso firm and erect.
Caution: Those suffering from a hernia or cervical pain are advised not to practice this yoga pose.
Exercises for Back Pain Relief
We thank Phoenix Rehab and Physiotec for the following images.
1. Prone on Elbows
Sets: 10 Hold: 3 min
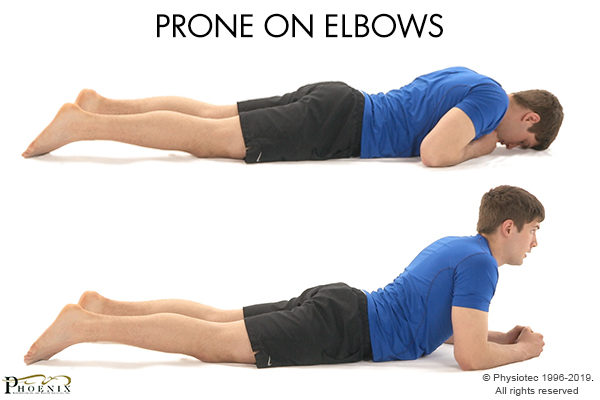
- Lie on your stomach.
- Tuck your elbows and arms under your chest and relax the abdominals and buttocks.
- Hold this position for a few minutes.
2. Press-Ups
Sets: 5 Reps: 10 Hold: 2 seconds
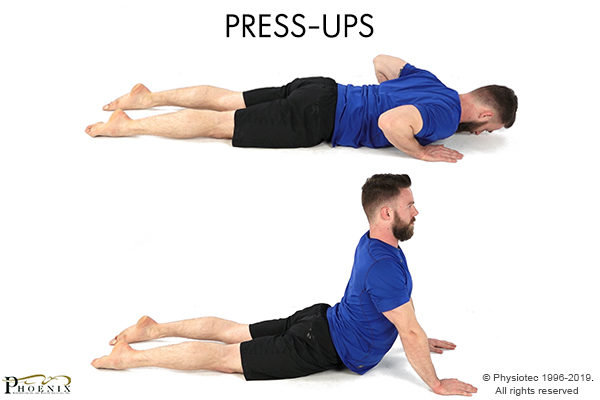
- Lie down on your stomach with your hands under the shoulders.
- Press up one vertebral level at a time, while keeping your lower back and buttocks relaxed.
- Perform the exercise as far as you comfortably can and pause, making sure your buttocks are relaxed.
- Return to the starting position.
3. Unilateral Passive Extension
Sets: 3 Reps: 10 Hold: 2 seconds
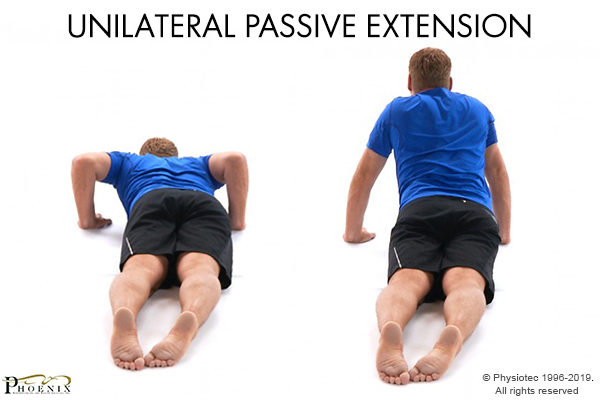
- Start on your stomach with your chin tucked in.
- Place your hands at approximately shoulder height and shift your hips and pelvis off to one side. (If your pain is one-sided, the hips should be offset toward the NON-painful side).
- While keeping the hips and legs on the table, press your trunk upward with your arms while relaxing the abdominals and buttocks.
- Slowly return to the neutral position and repeat.
Note: If this exercise centralizes the pain, then do press-ups with the hips neutral.
4. Repeated Lumbar Extension
Sets: 5 Reps: 10
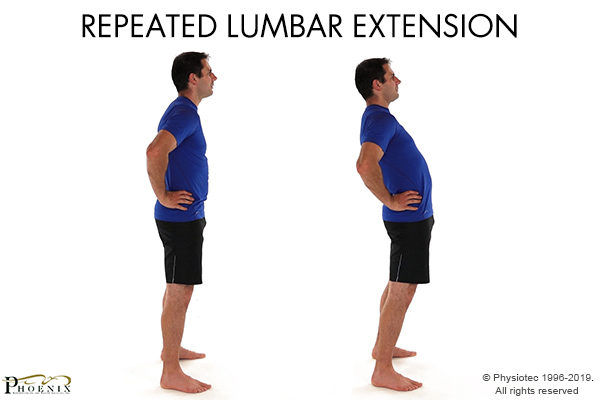
- Stand with your chin tucked in and place your hands on your buttocks.
- Bend your back backward, arching your lower back and keeping your chin tucked in (look forward).
- Return to the starting position and repeat.
5. Lumbar Extension
Sets: 5 Reps: 10
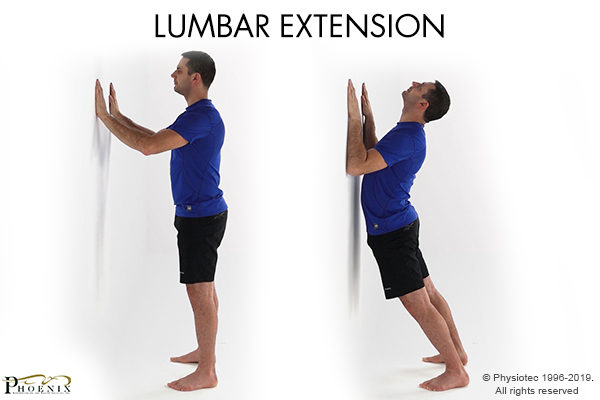
- Stand facing a wall with your feet shoulder-width apart and hands on the wall at shoulder height.
- Allow your back to arch as you lift yourself toward the ceiling starting with your neck, then your middle back, and finally your lower back.
- Slowly return to the initial position by following the same sequence and repeat.
6. Slouch (Overcorrect)
Sets: 1 Reps: 5
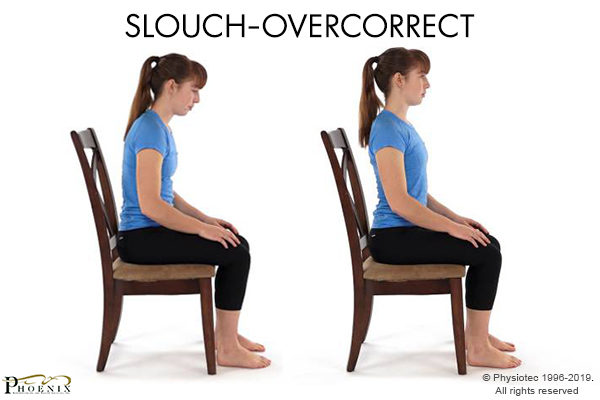
- Start with sitting down. Do not worry about your spine yet; just sit there.
- Slouch as much as you can.
- From that slouched position, straighten your spine as much as you can. Overcorrect your posture so that you look really awkwardly straight.
- Go between these 2 positions a few times. The point of this is to know what it feels like at both extremes. Note that neither of these positions are natural or correct.
- Finish on that weird, overcorrected, straight spine position.
- From this position, relax a little bit and decrease the straightness of your spine by about 10%. This is where your posture should most likely be.
7. Breathing Sequence
Sets: 10 Reps: 10
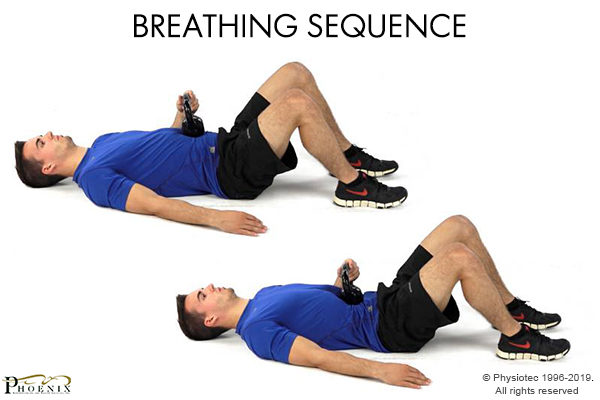
- For you to effectively use your diaphragm for breathing, you need to make sure your belly expands as you breathe in.
- You want to breathe in through the nose and out through the mouth – nothing in the chest and all in the tummy.
- Place a hand on your stomach. It should raise on the inhale.
Exercises That Can Worsen Back Pain
The natural tendency and automatic response of most people suffering from lower back pain are to stretch it out and bend forward.
Bending forward and stretching your back relieve the pressure of the displaced and misshapen disc from the nerves of the spinal column that the disc is hitting and causing pain. As a result, you experience short-lived pain relief.
But when you return to a normal position, you just displace the jelly and disfigure the disc even more. So, in the long run, these moves actually worsen the condition.
Expert Answers (Q&A)
Answered by Dr. Shayan Hosseinzadeh, MD (Orthopedic)
Yes, abdominal pain caused by trapped gas can radiate to the back. So, the presence of lower back pain along with gastrointestinal symptoms, such as a change in bowel habits, could be due to gastrointestinal problems. In this case, the symptoms usually subside by having a bowel movement.
Of course. Anxiety and high levels of stress both cause pain and also dramatically influence the perception of pain.
Acute psychosocial stress reduces the ability of the body to control any kind of pain, including lower back pain. Also, any mild musculoskeletal pain will feel much worse in this case.
Various kinds of exercises are suggested for back pain. Any exercise aiming at stretching the back muscles could be beneficial. However, you should remember that these exercises are not designed for the acute phase of severe back pain.
For this initial phase of pain, bed rest is usually considered a more efficient treatment approach.
Yes, lower back pain in IBS is pretty common due to hyperalgesia (an increased sensitivity to pain), which is believed to be the result of changes in the brain-gut pathway. (1)(2)
IBS is also linked to fibromyalgia (widespread musculoskeletal pain), in which the back is usually among the affected regions.
Use cold compresses, which reduces the pain and swelling. If the pain does not alleviate after 3 days, then it is time to see a doctor to rule out more serious conditions.
Work with your doctor to include appropriate aerobic activities, strength training, and flexibility exercises. Also, your doctor may prescribe some pain medications. Talk with him/her about the proper dose to take.
Heat therapies are also helpful, especially after 48 hours from the onset of symptoms. They cause increased blood flow and relax the muscles.
Osteoporosis: The vertebrae are prone to compression fractures if the bones become brittle and porous.
Musculoskeletal strain: Repeated or sudden awkward movements and constant strains on your back can cause painful muscle spasms.
Disc bulging: The disc works as a cushion between vertebrae. Nucleus pulposus, which is a soft material inside the disc, can bulge and press on nearby nerve roots, causing pain.
Arthritis: Spinal arthritis can lead to back pain secondary to spinal canal stenosis, which is characterized by the narrowing of the space around the spinal cord.
Skeletal abnormalities: Scoliosis, which is the abnormal curvature of the spine to one side, can lead to back pain later in life.
Read Further to Manage Back Pain at Home
This chapter is part of the Back Pain: Reasons, Risk Factors, and Treatment series.
In the next chapter, you can read about the Rheumatologist approved home remedies for back pain.
- Was this article helpful?
- YES, THANKS!NOT REALLY


