In this article:
Yoga is one of the few practices that provide physical, emotional, spiritual, and mental benefits. You can choose to practice yoga solely or use it as a supplement to a balanced fitness program.
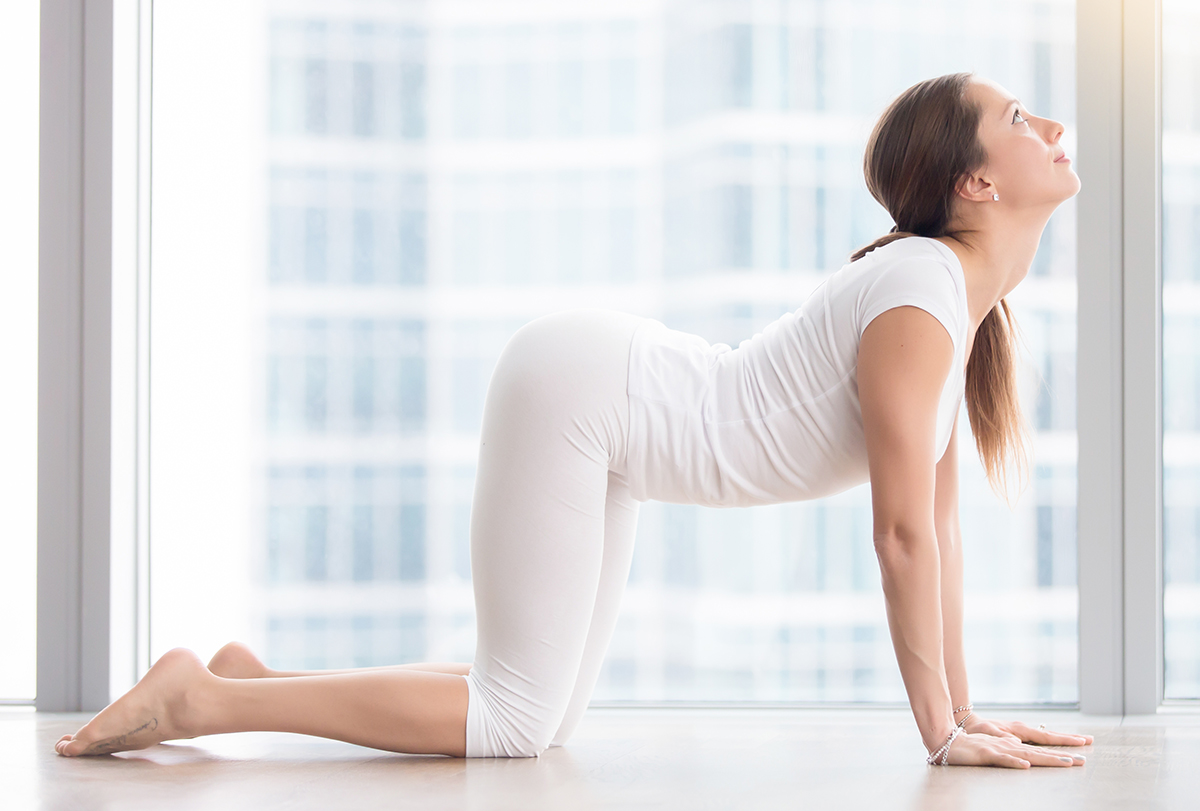
Some of the benefits of yoga are:
- Improved strength (1)
- Enhanced flexibility (1)
- Improved range of motion (1)
- Better balance and coordination
- Calm and relaxation
- Stress and anxiety reduction
- Improved sleep
- Improved cardiovascular function
- Promotion of respiratory and nervous system health
Yoga is also a practice that can evolve as you age and move through the cycles of life.
Menopause is a major time of transformation for women physically, mentally, and emotionally. The beauty of practicing yoga is that your practice can benefit and serve you during your transition into, through, and out of menopause. (2)(3)
You can reap the benefits whether you have been a lifelong yogi or you are new to the practice of yoga.
There are several limbs, or areas, that encompass a yoga practice. Asanas (poses) are one of the most commonly known and practiced. However, there are other limbs of yoga that can be greatly beneficial for menopause such as pranayama (breathe control) and dhyana (meditation).
Each of these areas can support you throughout your transition in, through, and out of menopause. Let’s discuss each area and the specifically helpful poses, breathing, and meditation techniques.
a. Beneficial Asanas (Yoga Poses) for Menopause
Try these simple yoga poses to relieve the discomforts associated with menopause
1. Cat-Cow pose
The cat-cow pose offers comfort to achy joints and opens the muscles and tissues in your chest and back. The pose can also be a grounding and supporting pose for when you are feeling overwhelmed.
Be mindful not to overextend the pelvic tilt when transitioning into the “cow” part of the pose.
How to do it:
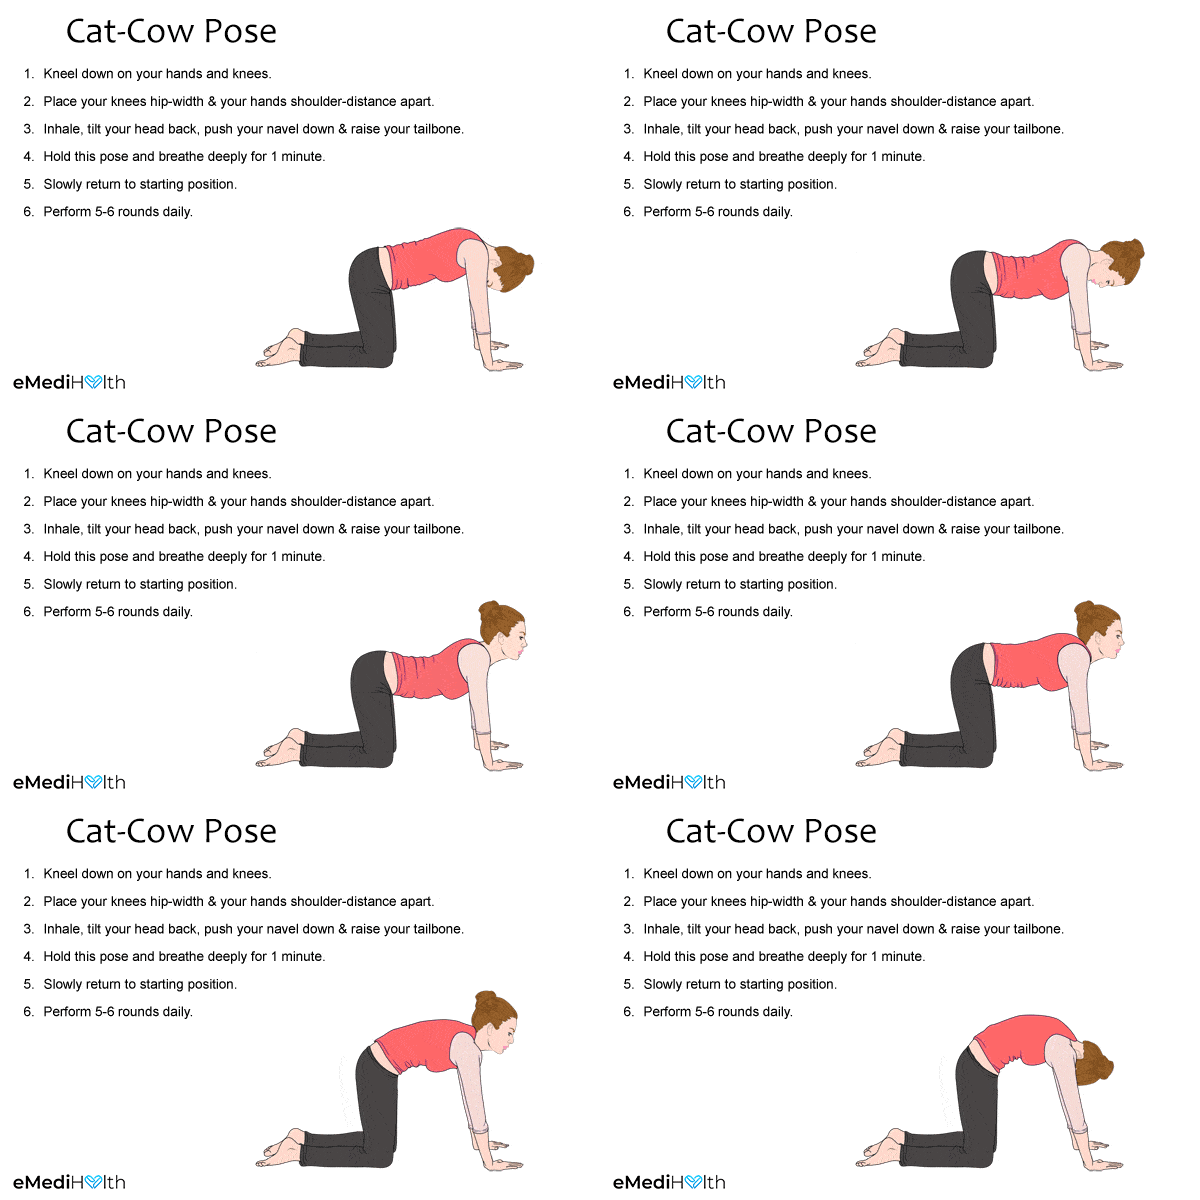
- Go down on your hands and knees, with your wrists in the same line as your shoulders and your knees in the same line as your buttocks.
- Part your shins and knees hip-width apart.
- Keep your head in a neutral central position with your gaze downward.
- Draw in a deep breath while dropping your abdomen toward the mat, lifting your chest and stretching your tailbone upwards.
- Look up toward the ceiling. This pose is known as the cow pose.
- Pull your shoulders away from your ears to broaden your collar bones, and move your shoulder blades toward the buttocks.
- Pull your stomach to your spine and round your back toward the ceiling while releasing your breath.
- Bring the top of your head toward the floor without forcing your chin to your chest. This is known as the cat pose.
- Return to the cow pose with an inhale, and then go back to the cat pose with an exhale.
- Repeat these alternating poses 5–20 times, and then relax by sitting back on your heels with your spine erect.
2. Lunge pose
The lunge pose is great for flexibility and mobility of your lower back, hips, and quadriceps. If you spend a lot of time sitting, this pose can be beneficial for stretching the psoas muscles, which connect your lower back to your upper thighs.
Some tips for performing the lunge pose:
- Use padding under your knee if needed.
- If raising your arms overhead causes pain or discomfort, bring your hands together at heart center or use two blocks to rest your hands on.
- Focus and connect with your breath. Take deep, slow breaths.
How to do it:
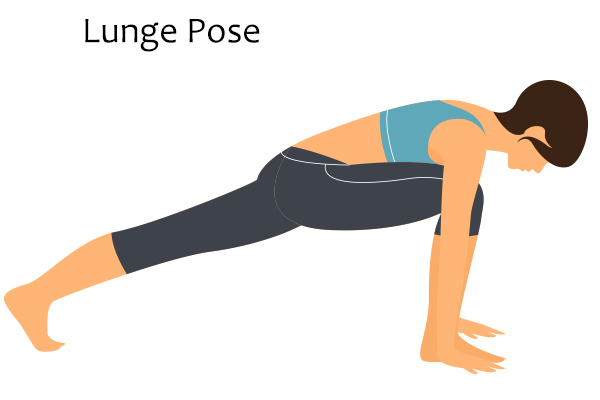
- Go down on your hands and knees, with your wrists placed directly under your shoulders and your knees directly under your buttocks.
- Press down your hands into the ground, and curl your toes to elevate your buttocks such that your legs become straightened.
- Push back your shoulders to broaden your collar bones while firmly pressing down your palms to ground yourself.
- Keep your head hanging down between your arms and fix your gaze on your feet.
- Transfer your body weight onto your quadriceps (front of the thigh) to take the pressure off your arms. This is known as the downward-facing dog pose.
- Once you are in this resting pose, exhale and bring your right foot forward beside your right hand.
- Gradually lower your left knee to the ground and place it behind your hips.
- With an inhale, slowly lift your torso perpendicular to the floor.
- Raise your arms above your head such that your biceps touch your ears, and join your palms to make a namaskar gesture.
- With an exhale, loosen your hips and move them forward to a comfortable extent such that you feel a decent stretch in the frontal part of your leg.
- Stretch your lower back while keeping your tailbone toward the ground.
- Tilt your arms further behind your head so your heart is pushed up.
- Try to look behind as you progress into this acrobatic position.
- Maintain this pose for 15–30 seconds.
- Return to the downward-facing dog position by slowly bringing your hands back to the floor.
- Repeat the same process with the other leg.
3. Forward-Facing hero pose
A wonderful physical and mental enhancing pose! When doing the forward-facing dog, not only are the muscles of your ankles, feet, shins, hamstrings, hips, back, and buttocks stretched, but the muscles in the entire length of your spine are too!
A bonus is as you drop into this pose, your head is lower than your heart, which soothes the nervous system, creates a feeling of calm, and relaxes the body. This is a grounding pose that offers support for stress, anxiety, and tension.
Some things to consider:
- Use a bolster or stacked pillows if you are unable to lower your chest to the floor.
- Roll up a blanket and place it behind your knees if you are uncomfortable dropping your hips to your ankles.
How to do it:
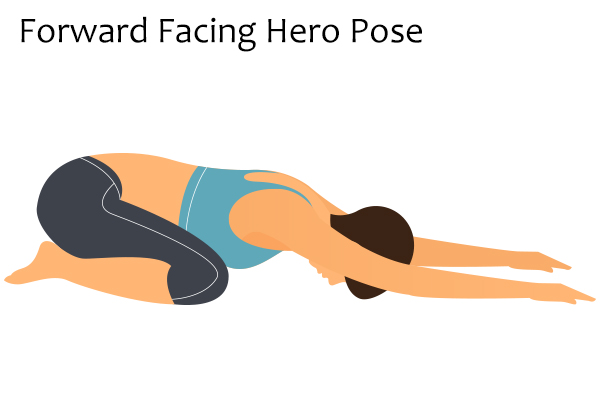
- Sit on your heels with your legs tucked under your hips and your palms on respective thighs.
- While keeping your toes joined together, spread out your knees one by one.
- Extend your arms in front of you, and place your hands on the floor without bending your elbows.
- With an exhale, drop your torso such that your forehead touches the mat.
- Raise your underneath elbow upward without bending your arms straight, spreading your fingers apart evenly and pressing your thumb and index finger mounds into the mat.
- Stretch out your spine by moving your hips back toward the back of the mat and pushing the top of your head toward the front of the mat.
- Hold this position for 2 minutes.
- To release the pose, slowly elevate your trunk and walk your hands back toward your knees.
- Join your knees together, put your hands on your thighs, and come back to the starting position.
4. Sphinx pose
The sphinx pose is a chest-opening pose that stimulates the sympathetic nervous system, which can help with a sense of fatigue, sluggishness, and depression.
The sphinx pose can be energizing and rejuvenating and can stretch the chest, shoulders, and lower back. It is a great alternative to more challenging, traditional backbend movements.
When performing this pose, consider rooting your pelvic bone, legs, feet, and toes to the floor to stabilize and support your lower back. Keep your core engaged throughout the movement. Take deep, expansive breaths.
How to do it:
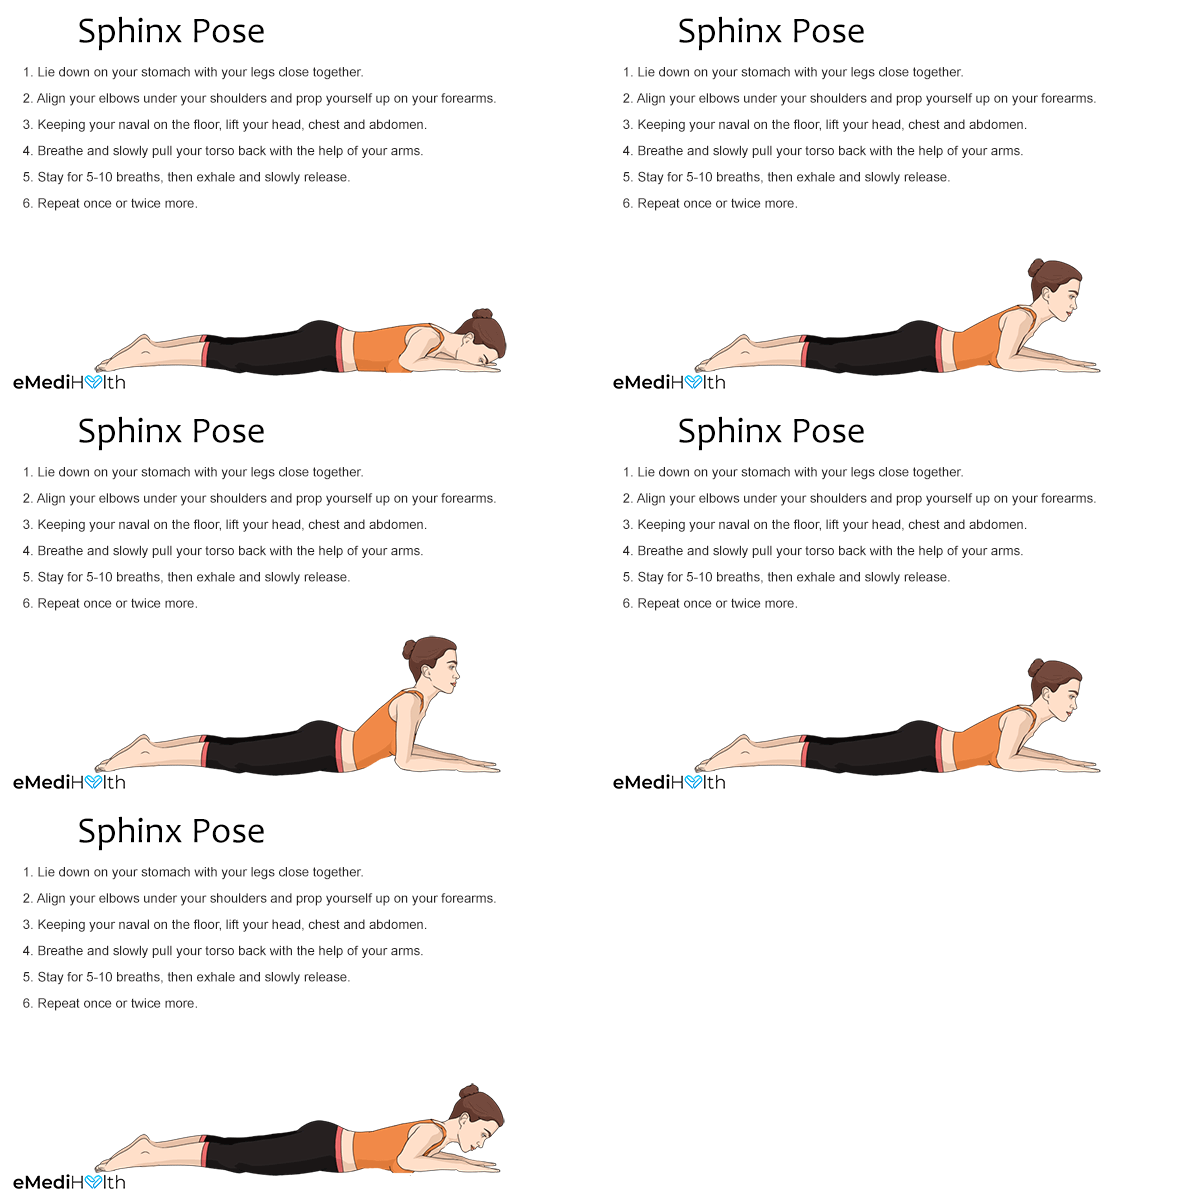
- Lie down on your tummy with your legs together such that your feet and heels lightly touch each other and your toes and forehead rest on the ground.
- Extend your hands in front of you with palms turned down and arms touching the floor.
- While inhaling deeply, slowly raise your head, chest, and abdomen while keeping your navel on the ground.
- Lift your upper body off the ground with the support of your arms.
- Perform mindful breathing as you curve your back, vertebra by vertebra. But in doing so, keep your feet close together and head facing straight ahead.
- With an exhale, slowly bring down your abdomen, chest, and head back to the floor.
5. Forward bend pose
A truly a full-body pose! The forward bend pose stretches the hamstrings, hips, and calves, as well as strengthens the thighs and knees. It also keeps your spine flexible, strong, and supple.
When you do this pose, you will benefit from a reduction in stress, anxiety, depression, and fatigue symptoms, in addition to a sense of calm and soothing of the nerves. You will also feel a sense of relief from tension in the neck, shoulders, and back.
Be sure to relax your jaw and take deep, relaxing breaths.
How to do it:
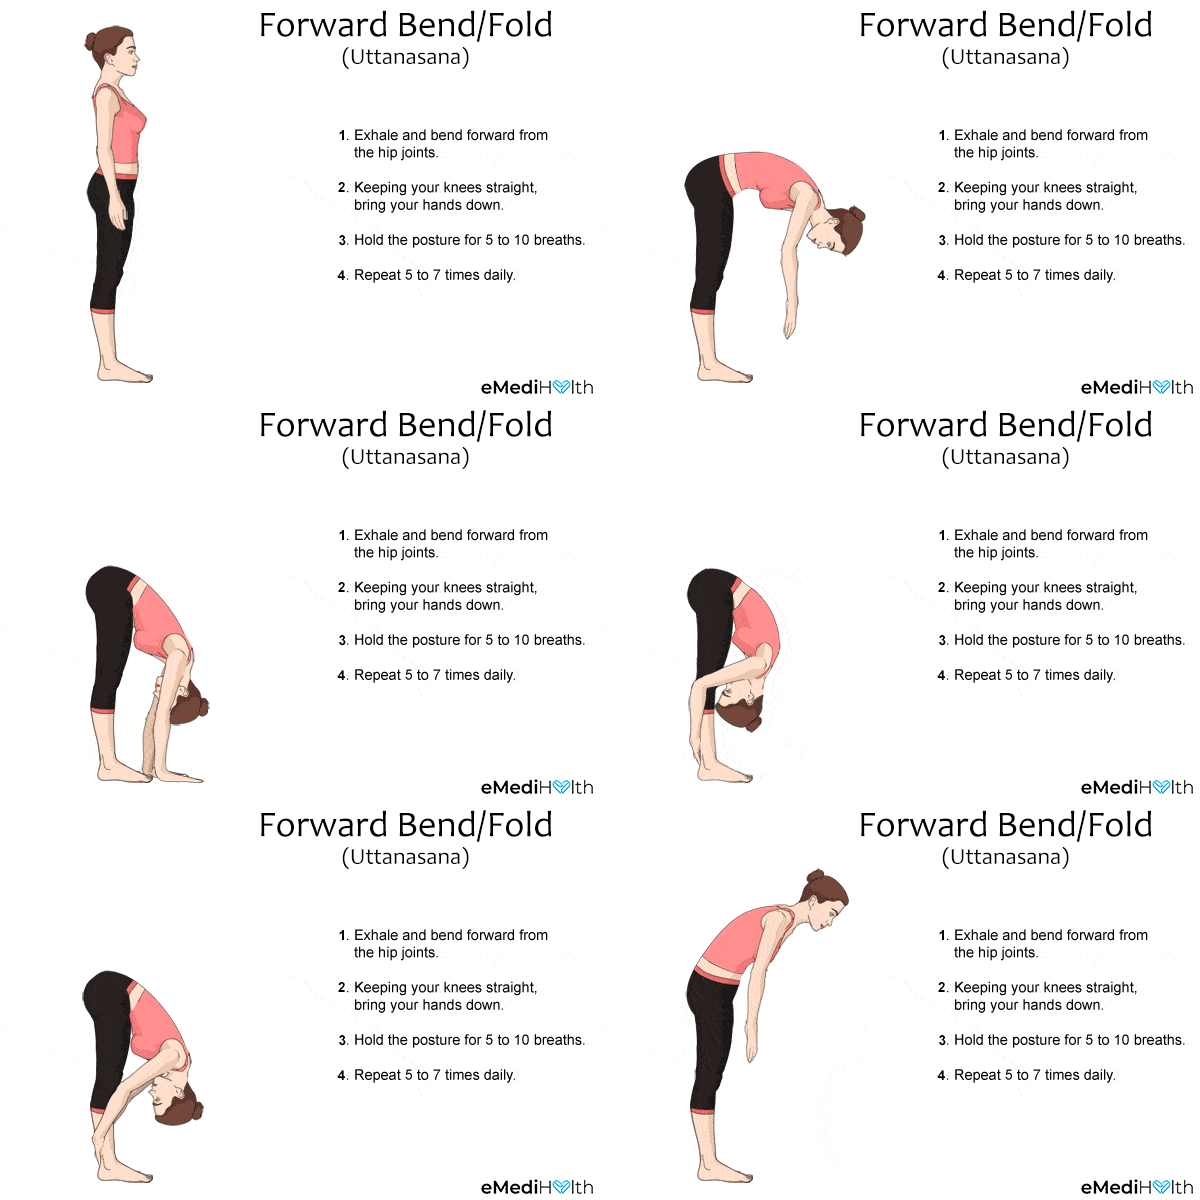
- Stand with your big toes touching each other and your heels slightly apart so that your ankles don’t knock into each other. Distribute your body weight equally on both feet.
- Press your feet and calves down to ground your body.
- Tighten your upper thighs to slightly lift your knee caps.
- Press your thighs inward to broaden your sit bones.
- Keep your shoulders right above your pelvis, raise them toward your ears, and then roll them back to point your shoulder blades down your back. This will broaden your collar bones.
- Draw in a deep breath to suck your stomach in.
- Release your breath, and slowly bend forward pushing out your hips rather than curving at the waist. While doing so, loosen your knees but tighten the calves so that your legs remain straight.
- Try to put your hands on the floor. But if that’s too difficult or uncomfortable, you can interlock your arms or place your hands somewhere on your legs.
- Let your head hang.
- Stay in this posture for 5–10 breaths.
- Repeat 5–7 times daily.
6. Fan pose
Considered a “heart opener,” the fan pose stimulates the immune system, opens the upper respiratory muscles, and stretches the shoulders and arm. It also stretches the hamstrings, calves, hips, lower back, and ankles.
This pose can also increase mobility and flexibility in the shoulders, shoulder blades, and chest muscles. Additionally, you will experience a sense of relaxation, calm, grounding, and peace.
If you need additional support for this pose:
- Bend your knees as much as you need to if you find your hips, hamstrings, or back are tight.
- You can also use a block if your hips, hamstrings, or back are too tight to reach the floor.
How to do it:
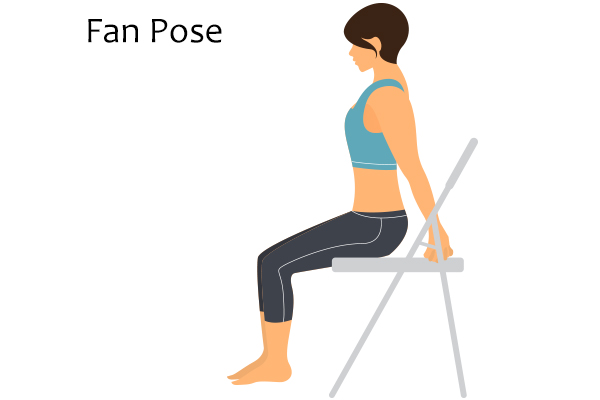
- Sit upright on the front edge of a chair with your feet firmly planted into the ground, while keeping your back off the chair.
- Put your arms behind against the backrest while keeping them straight and without curving your spine. Make sure your heart is at the center and your chin is parallel to the ground.
- Pull your shoulder blades back. If you have tense or painful shoulder muscles, place your arms lower on the chair for more comfort.
- Hold this position for 30–60 seconds and then relax.
7. Warrior II pose
Warrior II is an “open hip” pose that stretches and strengthens your hips, back, and groin and stimulates your abdominal organs and muscles. This also opens your chest and lungs and improves circulation and respiration.
You will develop better balance and stabilization while creating a sense of grounding and body awareness when you practice this pose.
How to do it:
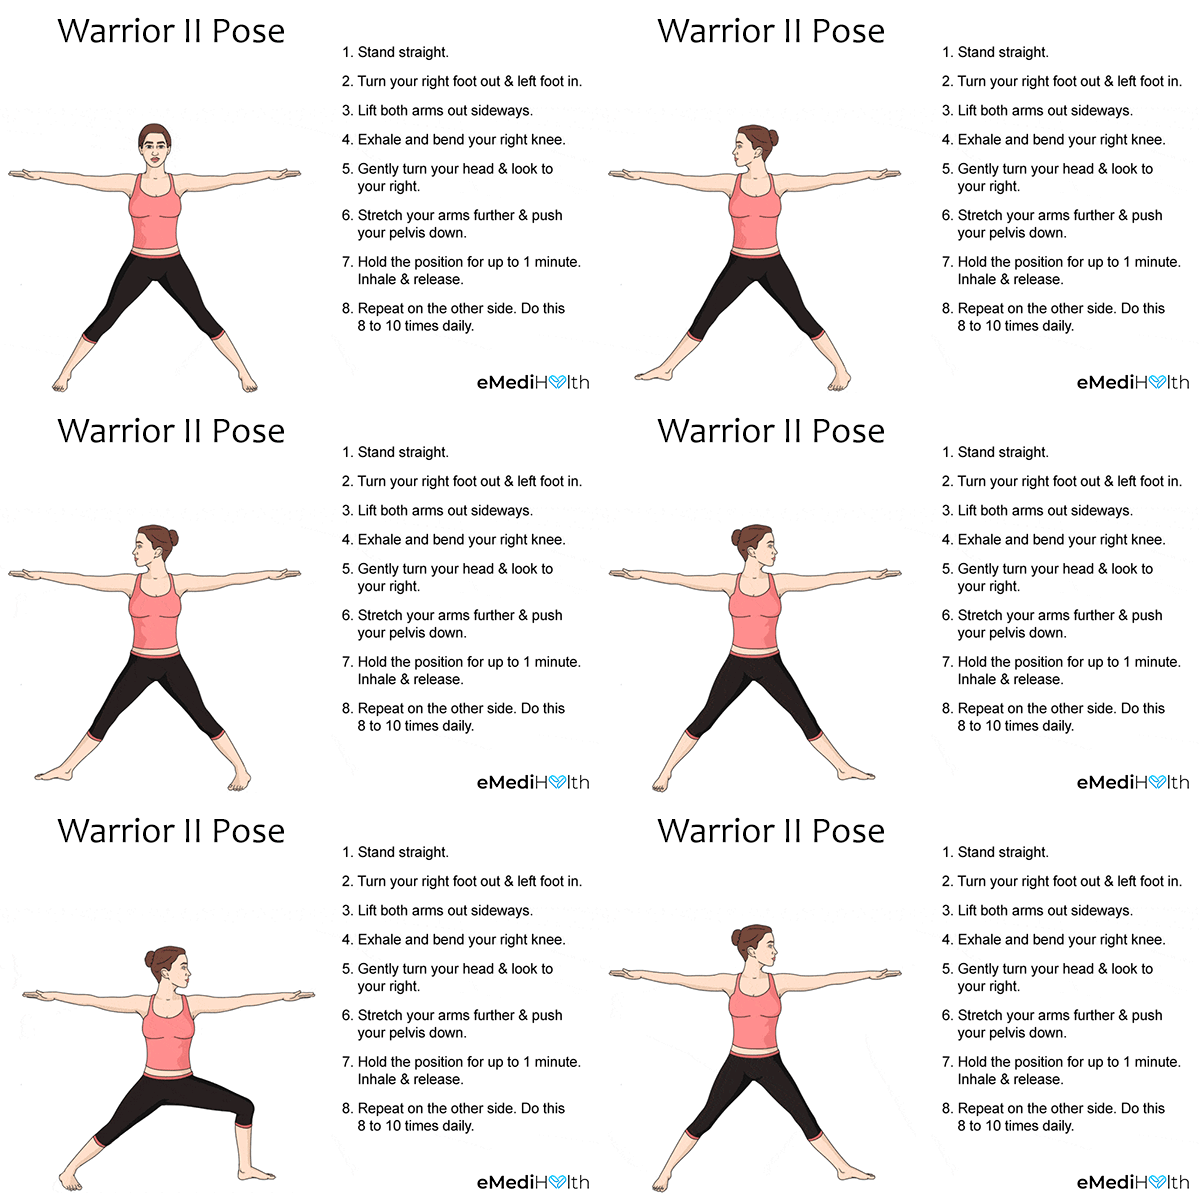
- Stand straight with your feet joined together and your palms beside your body.
- Breathe in and move your right leg as far back as possible, but don’t overstretch.
- Point your right foot toward the long edge of the mat, making a 90° angle at the ankle.
- Release your breath and go down on your left knee such that your thigh is parallel to the ground. Make sure that your left knee is directly above your left ankle and in line with your left heel.
- Breathe in and raise both your arms at shoulder level with the palms facing the floor.
- Push down the outer edge of the right foot and right heel firmly into the ground for balance.
- Move your head to gaze at the left middle finger.
- Maintain this position for 30–60 seconds
- Inhale and straighten your left knee to release this pose.
- With an exhale, put your palms alongside the body, turn your left foot right toward the long edge of the mat, and gradually walk your feet toward each other.
- Do the same pose on the left side.
8. Legs-up-the-wall pose
A favorite pose of many practitioners, leg up the wall is a stress-relieving pose that allows your muscles to completely relax. It can also help calm the nervous system, which can reduce stress, anxiety, and tension. (4)
This pose is a passive stretch pose for the hamstrings and chest, as well as a supportive pose for discomforts in the lower back, neck, and shoulders.
If you do have lower back discomfort, you can place a blanket, cushion, or bolster under your lower back. Be sure not to prop yourself up too high as that may increase the discomfort.
How to do it:
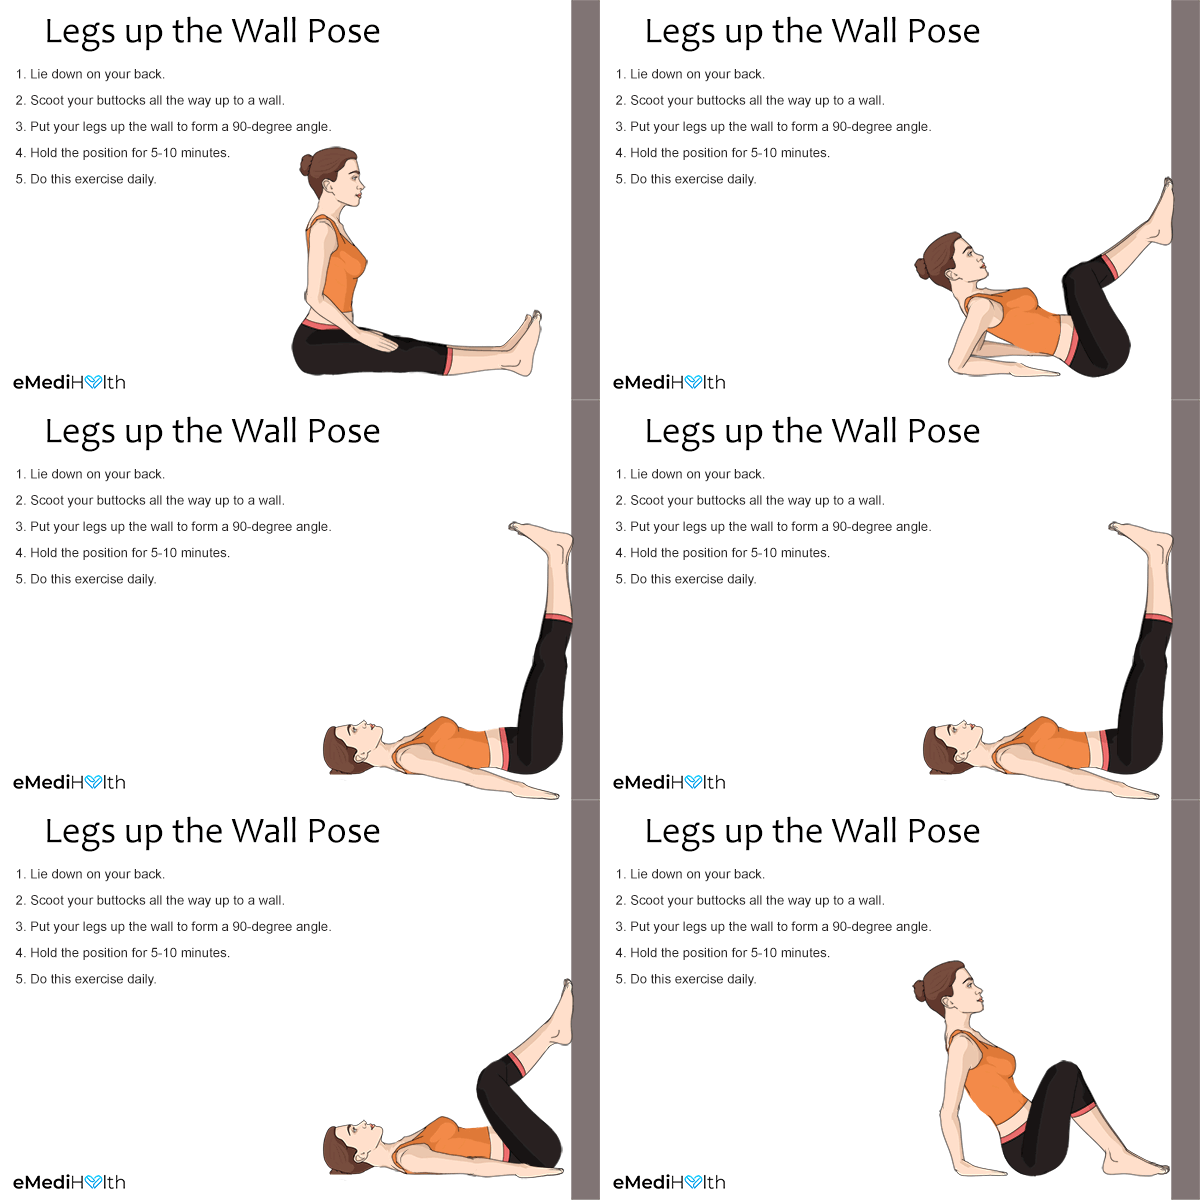
- Place the shorter edge of your yoga mat against a wall.
- If you want you can place a couple of folded blankets or a rectangular yoga bolster on the mat against the wall that will come under your hips for added support.
- Lie down with your head and shoulders on the mat, your hips on the folded blankets or bolsters, and put your legs up against the wall.
- Your sitting bones don’t have to be totally up against the wall, so you can move a little away from the wall to comfortably swing your legs up against it.
- Slightly press your chin toward your chest and place your arms by your sides with the palms facing up.
- Hold this position for 5–10 minutes.
- To come out of the pose, gently push your body away from the wall.
- Lie on your back for a few minutes until you are totally relaxed.
- Bring your knees to your chest and roll onto your right side.
- Rest for a few moments and then slowly move into an upright position
b. Beneficial Breathing (Pranayama) and Meditation (Dhyana) Practices
In addition to asanas, the breathing techniques and meditation in yoga practice can offer additional support and benefits during the transition to menopause.
Breathing techniques
Breathing techniques reduce stress, anxiety, depression, and tension. They can be so beneficial all throughout your life and especially during menopause.
These techniques increase alertness, self-awareness, centering, focus, grounding, and concentration. (5) It is a wonderful tool to support you throughout menopause.
Yoga offers many breathing techniques which can be done as follows:
1. Ujjayi pranayama
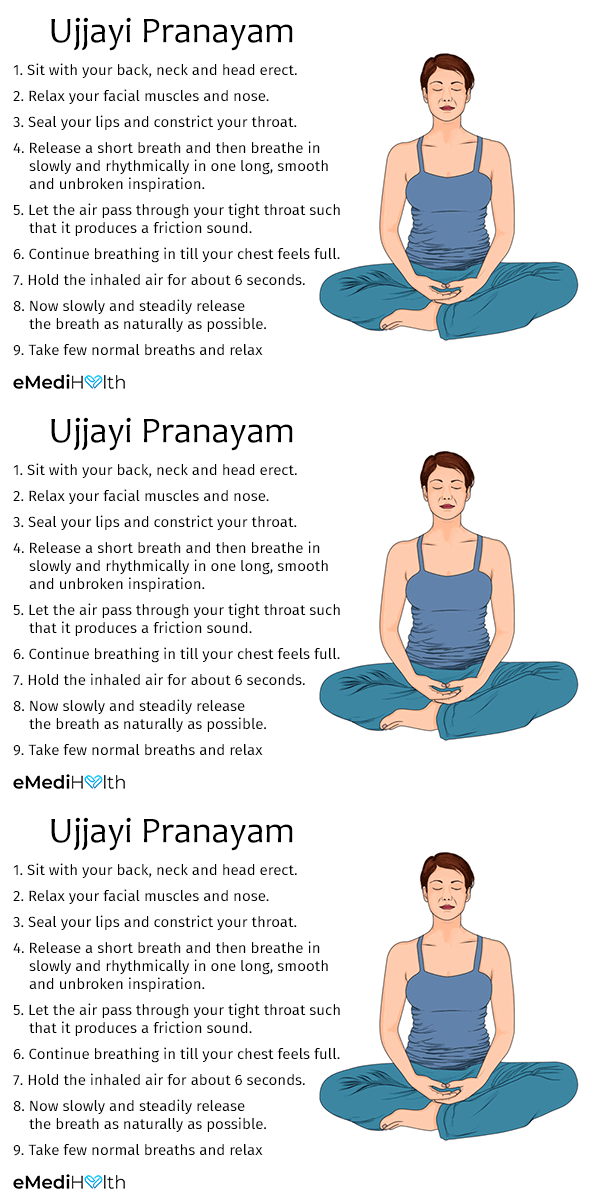
- Sit with your back, neck, and head erect.
- Relax your facial muscles and nose.
- Seal your lips and constrict your throat.
- Release a short breath, and then breathe in slowly and rhythmically in one long, smooth, and unbroken inspiration.
- Let the air pass through your tight throat such that it produces a friction sound.
- Continue breathing in till your chest feels full.
- Hold the inhaled air for about 6 seconds.
- Slowly and steadily release the breath as naturally as possible.
- Take a few normal breaths and relax.
2. Alternate nostril breathing
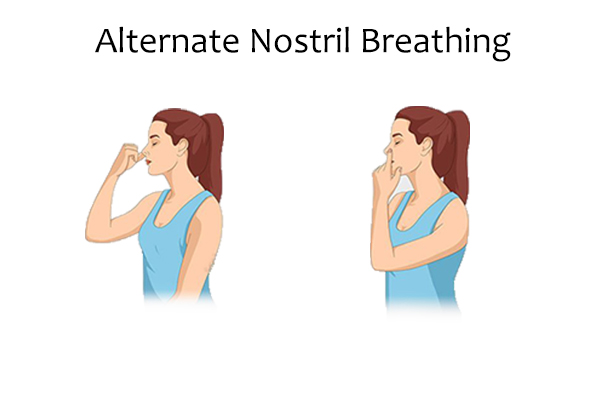
- Sit upright with your spine erect and your chest wide open.
- Place your left palm comfortably on your lap, and put your right hand just in front of your face.
- Rest the pointer finger and middle finger of your right hand between your brows, lightly using them as an anchor. You’ll be actively using the thumb and ring finger.
- Close your eyes and breathe deeply through your nose.
- Plug your right nostril with your right thumb, and slowly breathe in through the left nostril.
- Use your ring finger to close your left nostril and hold your breath at the top of the inhale for a brief period.
- Remove the thumb from your right nostril to exhale slowly and pause briefly at the bottom of the exhale.
- Slowly breathe in through the right nostril and then put the thumb back over it.
- Remove the ring finger from your left nostril to exhale slowly, pausing briefly at the bottom of the exhale.
- Repeat for 5–10 cycles, focusing your mind on each inhale and exhale.
3. Breath retention
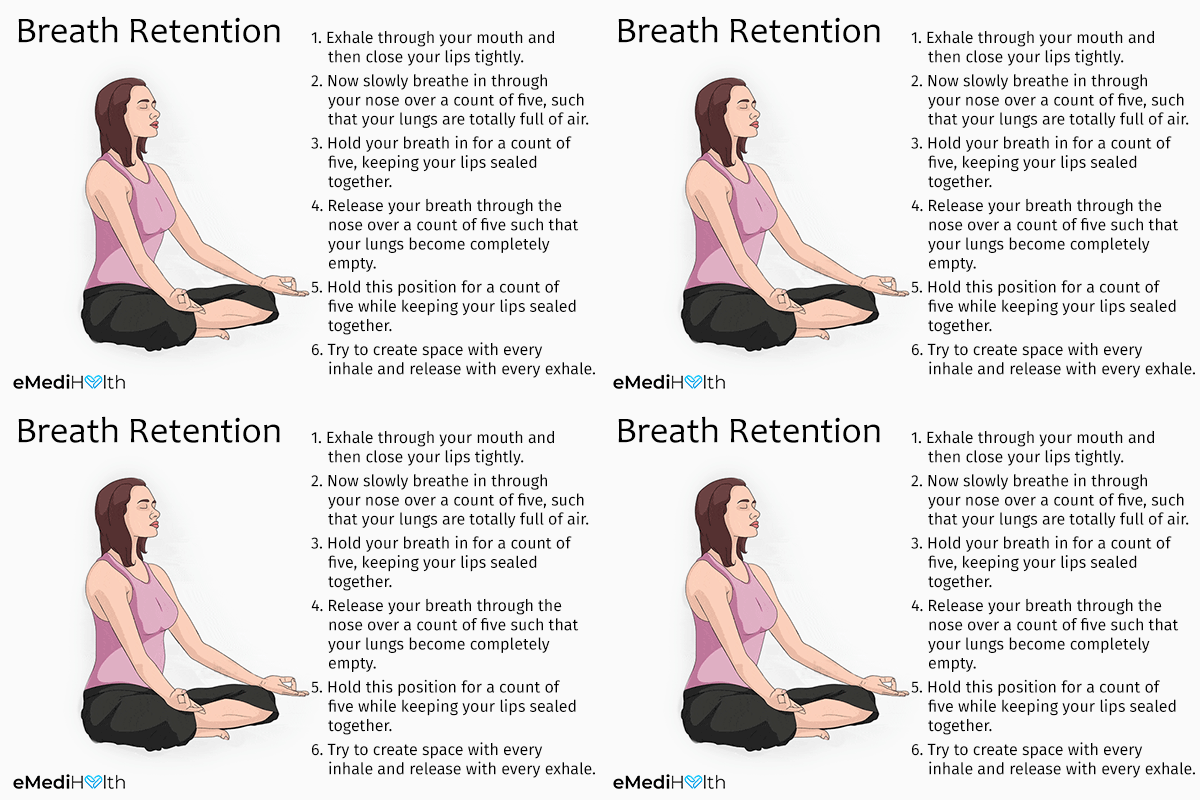
- Exhale through your mouth and then close your lips tightly.
- Slowly breathe in through your nose over a count of five, such that your lungs are totally full of air.
- Hold your breath in for a count of five, keeping your lips sealed together.
- Release your breath through the nose over a count of five such that your lungs become completely empty.
- Hold this position for a count of five while keeping your lips sealed together.
- Try to create space with every inhale and release with every exhale.
4. Breath of fire
- Sit straight to extend the space between your navel and your heart as much as possible.
- Breathe through your nose, pulling your belly in during the exhale and pushing it out during the inhale. The inhalation and exhalation should ideally be of equal length and intensity.
- Gradually shorten each breath to accelerate the exercise. You must breathe loudly and fast.
Meditation practice
Meditation is a calming and supportive practice throughout the transition of menopause. Incorporating a meditation practice can help with managing stressful and anxious situations, as well as assist with building new management skills. (6)
You will learn how to focus and become more centered, balanced, and self-aware. Negative thoughts and emotions will be reduced. (7) A consistent meditation practice can become a safe haven during times of transition and upheaval.
Final Word
Menopause is one of many transitions into the next phase of life. A yoga practice, coupled with breathing techniques and meditation, can offer a gentle and supportive approach to managing menopause. You can perform any aspect of yoga practice daily for consistency, balance, and centering benefits.
For maximum benefit, consider practicing yoga along with healthy and balanced nutrition, being active daily, having a regular sleep schedule, drinking plenty of water, and watching your alcohol intake.
If you find you are needing additional support, be sure to contact your doctor. Menopause is a beautiful transition into the next phase of your life. Yoga can support you throughout all stages of your transition.
- Was this article helpful?
- YES, THANKS!NOT REALLY


